Tethering: previewing photos during a shoot on a monitor or tablet

Tethering, or simply previewing photos during a shoot just moments after pressing the shutter, is a huge convenience that I use regularly. It makes it much easier to judge whether everything in the photo is right. The photographer, makeup artist, assistant, and the rest of the crew all get an easy look at every shot. I probably don't need to explain how much this improves the chances of catching everything that needs fixing.
Introduction to tethering
Immediate photo preview is commonly called tethering, although tethering usually also lets you control the camera from a computer, for example. You can change the ISO, shutter speed, focus point, and other settings without walking over to the camera. Photo preview is only one tethering feature, but the terms are often used interchangeably, and I'll sometimes do the same.
Remote camera control is great for macro shots, product photography, and many other uses, but in my case all those features are unnecessary. All I care about is seeing the photo on a larger screen shortly after I take it. There are several ways to do that.
Table of contents
- Photo preview from the ground up
- Wired connection Which cable Software for Mac/PC
- Wireless connection Eye-Fi cards Software for mobile devices
- Preview instead of a histogram
- My adventures with larger screens: Big Tower + 24" monitor Mac Mini + 24" monitor 15" MacBook Pro Retina MacBook Pro Retina + 32" monitor iPad
- How do you set up photo preview conveniently?
- My preview rig
- Model vs. screen
- Summary
Tethering and photo preview from the ground up
Displaying photos directly on a computer screen requires a few things: usually a computer with a tethering application and a cable connecting the computer to the camera. Wireless options also exist, but unfortunately they're usually slower than a wired connection. What matters here is the delay before the photo appears on the monitor. Tethering always has some delay, but it can be shorter or longer. Fortunately, there are ways to deal with it. I use both wireless and wired methods.
Wired connection
Which cable should you use for tethering? Obviously, it'll be a USB cable, usually Mini or Micro in version 2.0 or 3.0 depending on the camera model. The maximum safe length is 5 meters. If you need a longer one, it has to be active. If you know 3 meters will be enough, that's the length you should buy. The shorter it is, the lower the risk of problems. It used to be difficult to find a USB-to-Micro-USB cable of the right length. Only cables a dozen or so centimeters long were available. Back then, I used a very short one connected to a USB extension cable, which was easy to find. Three meters is more than enough for my beauty shoots. It's enough for full-body shots too, because when I move far away from the model, the table holding the preview equipment has to move as well. Looking at a monitor from several meters away makes no sense. You'll see no more than you would on the camera's LCD, and possibly less.
Although cameras have HDMI outputs, they aren't used for previewing photos. HDMI is for using an accessory display while filming. A still image scaled this way often looks very bad on a large screen.
Software for Mac/PC There are various tethering applications. I'll focus on the ones I have experience with:
- Lightroom (macOS, Windows | Nikon, Canon, Leica. Also Hasselblad and Fuji after installing a plugin)
Since I have the Creative Cloud Photography plan, which includes Photoshop and Lightroom, I use the latter for tethering. Earlier versions sold without a subscription had this option too. The advantage of using Lightroom is that it displays photos exactly as they'll look during RAW development and further editing. RAW files can look completely different depending on the converter. Since Lightroom and Photoshop use the same development engine, Adobe Camera Raw, the photo on the preview screen will look identical to the one I see when I begin editing it. If I know that I'll edit a photo with the Adobe Standard profile or any other profile, I just set it as the default in Lightroom and I'm done. The photos are adjusted accordingly. I can also apply any necessary corrections immediately, such as slightly brightening the shadows. Unfortunately, preview in LR is very slow compared with Smart Shooter. To enable tethering in Lightroom, select File > Tethered Capture > Start Tethered Capture…
 From that point on, each photo will automatically appear on the computer screen after you take it. The downside is that Lightroom doesn't have many configuration options:
 Most importantly, it can't save to the memory cards and the computer drive at the same time. Photos are transferred from the camera straight to the computer, bypassing the cards that could serve as a backup. However, if another program is continuously copying photos from the camera to the computer, Lightroom can open them automatically using auto import. File > Auto Import > Auto Import Settings… (and then Enable Auto Import):

- Smart Shooter (macOS, Windows) This program was created exclusively for tethering. It's very fast and has far more configuration options than Lightroom, including simultaneous saving to memory cards and the computer. Unfortunately, that didn't work with my Nikon D810. The memory cards were still bypassed. Smart Shooter is relatively expensive, but you can test it before buying.
- SofortBild (macOS | Nikon) Another program made for just one purpose, although this one is free. I used it several years ago, and it was the most unstable application I'd ever had on a Mac. Several years have passed since then, so it should be better now.
- Other applications You can find a list of other tethering programs at tethertools.com, among other places.
Wireless preview
There are also wireless options for transferring photos. Canon and Nikon both have their own proprietary solutions, but I don't have any experience with them. There is one fairly universal method that allows previewing on iPads and Android tablets regardless of which camera you use: Eye-Fi cards.
Eye-Fi SD cards These are SD memory cards with a built-in Wi-Fi transmitter. Once you install a dedicated application on your device, you can transfer photos wirelessly right after taking them. It basically happens automatically. Just connect the tablet to the Wi-Fi network created by the card and launch the software. You can also connect the card to an existing network from a router.
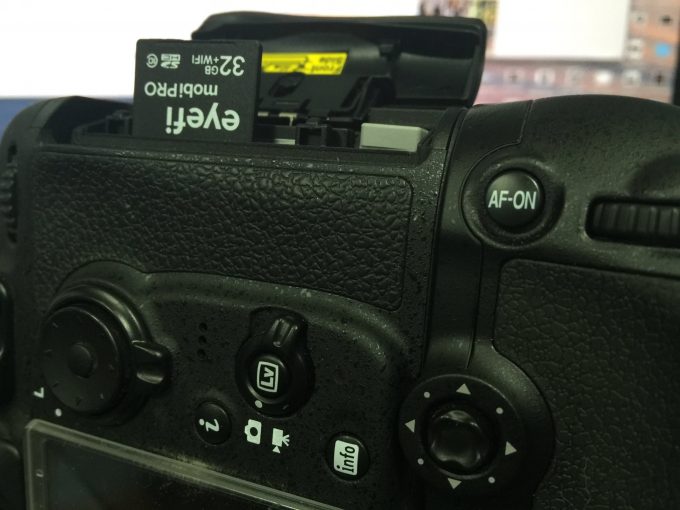
Speed is a frequently discussed problem with Eye-Fi. A wireless connection is slower than a wired one, and because RAW files from current cameras can be very large, they take a long time to transfer. There is a workaround. Cameras increasingly come with two memory card slots instead of one. You can configure them so RAW files are saved to a regular card while JPG files go to the Eye-Fi card. JPGs take up incomparably less space, especially at basic quality. I think that's what everyone does. Even if the camera has only one slot, you can save RAW and JPG simultaneously and set the tethering application to skip the RAW files.
Even with this setup, quite a few people still complain that photos take an awfully long time to copy. I suspect older cards simply had lower-bandwidth Wi-Fi, as did many tablets.
I use an Eye-Fi Mobi Pro card that supports N-standard Wi-Fi. There is no point discussing the theoretical speeds because they're obviously far removed from reality. Let's focus on the real transfer times I get. When I set my camera, a Nikon D810 with a 36 MP sensor, to save basic-quality JPG files, which are more than good enough for previewing, a photo takes about 8 seconds to transfer. I'll add that the iPad Pro has AC-standard Wi-Fi, so it isn't the bottleneck.
The question is whether that's fast enough. Ideally, I'd shorten the time a little more, but it isn't bad. I was afraid I'd have to wait more than half a minute for every photo because many people told me that would happen even with small JPG files. As I wrote earlier, though, perhaps the older cards were simply slower.
So the speed isn't perfect, but it's enough for reasonably comfortable work. For comparison, I wait about as long for a photo when tethering in Lightroom, except that Lightroom is transferring a RAW file.
Problems Right out of the box, the card can drive you mad when you try to use it for a shoot. It constantly disconnects from the network, forcing you to reconnect, exactly every 60 seconds. This happens because the card has power saving enabled by default. Fortunately, you can change it. Insert the card into a reader connected to the computer, open Preferences > Mobi Cards in the Eyefi Mobi application, and change 1 min to another value.
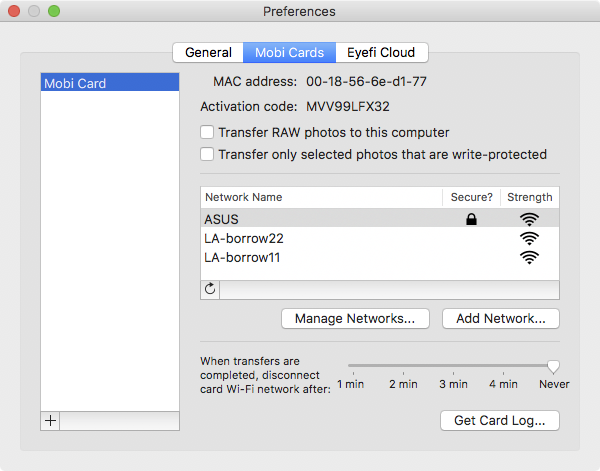
I set the card never to disconnect. The drawback is that I have to remember to turn the camera off manually after a shoot. Before this, it would sit switched on for months. Wi-Fi drains the battery. You can also disable the card's Wi-Fi in the camera menu. The relevant option appears only when the Eye-Fi card is in the camera.
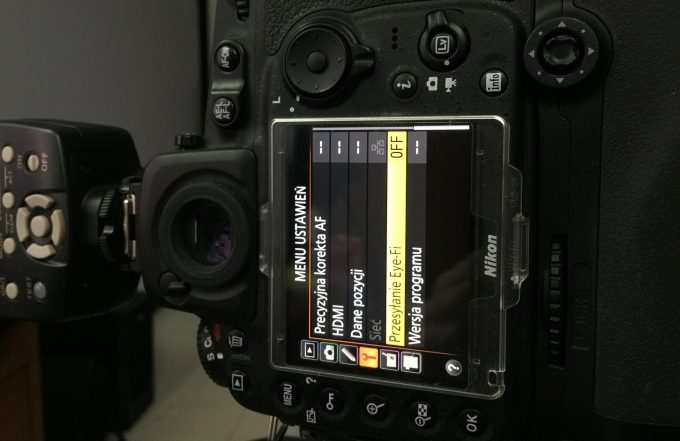
Because an enabled Eye-Fi card increases power consumption, it's worth carrying a spare battery if you're planning a long shoot. I don't need one for my shoots lasting a few hours, 2 to 5, but I always carry a spare battery anyway.
Software for mobile devices
To preview photos on a tablet, for example, you need an application made by the manufacturer or an outside developer. I'll say this right away: the manufacturer's software isn't good enough. It lacks basic features, namely automatically displaying the latest photo full screen and showing the histogram. Fortunately, there's ShutterSnitch, which has these features and works well. It cost me just under 20 dollars and was definitely worth buying. Unfortunately, it's now available through an even more expensive subscription, but since I bought an earlier version, I only have to pay for the extra options I don't need. If I had to use the manufacturer's application, I simply wouldn't have bought Eye-Fi at all because it couldn't replace the preview setup I had on my computer.
An additional preview screen isn't for judging photo exposure
Whether it's on a huge monitor or a tablet, the preview must never be used to judge whether photos are correctly exposed. That's still what the histogram is for. Correctly exposed photos are usually brighter than they'll be after editing. That means they'll look too bright even on a monitor calibrated for retouching, especially when the studio lighting is dimmer than the lighting at the retouching workstation. Of course, the same applies to the camera's built-in screen. Even when photos aren't exposed to the histogram, they'll look much brighter on the camera's LCD in a dark studio than they really are. That's why I dim the camera screen in the settings. It's also best to lower the backlight on the tethering screen during a shoot.
My adventures with larger screens
At first, I connected the camera to the computer with a cable for a long time. The first time I took a monitor to a shoot was when I still had a PC in a big tower case, meaning one of those very tall cases that nobody uses anymore. The water-cooling pump wasn't permanently attached in any way. It simply lay at the bottom of the case and bounced around whenever I carried it. On top of that, both side panels were permanently removed. One look at it inspired a mixture of horror and pity. This computer was completely unsuitable for transport. I took it to a shoot once. That was still one time too many.
Then came the Mac Mini, a computer lighter than the laptops of the time. Compared with my previous machine, it seemed almost ultra-mobile, and the need to bring a keyboard, mouse, power cables, and an extension cord didn't seem like an obstacle. Packing it took only a moment anyway, and everything fit into a small bag for a 13" laptop. Today, I'd simply buy a miniature keyboard with a built-in touchpad and keep it packed in the bag at all times along with extra cables.
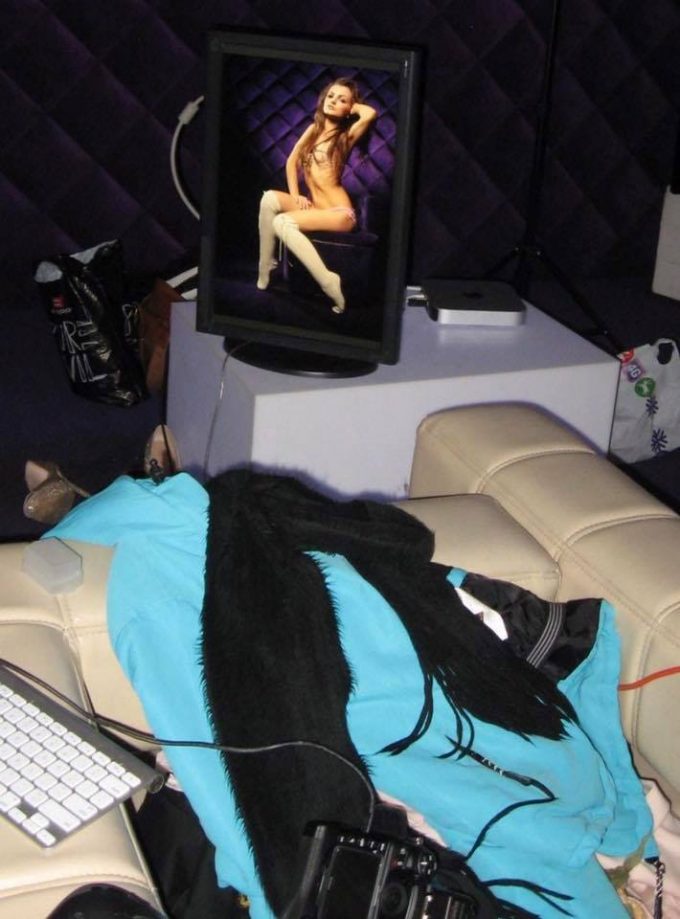
This computer and a 24-inch monitor accompanied me on many shoots. I regularly used the PIVOT function, which meant turning it vertically instead of horizontally. Once I was using an Eizo CX240 every day, and later a CG246, I still took my old Gateway with its S-PVA panel on location. The Eizo deserved to be looked after, while I threw the Gateway into the car without any extra packaging and didn't have to worry about anything. If it got damaged, nobody would care. Over time, I forgot how large my previous computer case had been and the whole setup began to feel less mobile. Eventually, I took the Mac Mini to shoots less and less often.
The next stage was a laptop, the 15" MacBook Pro Retina. This was just after I moved from Poland to Bangkok, when I'd parted with my external monitor and didn't own any additional display for a while. The MacBook worked brilliantly for tethering. I didn't have to bring a mouse, keyboard, monitor, or power cables. The built-in battery lasted through the entire shoot, and the screen itself was surprisingly good for a laptop.
One very important detail is that I used the laptop with its screen vertical during shoots, which means the MacBook stood on its side.
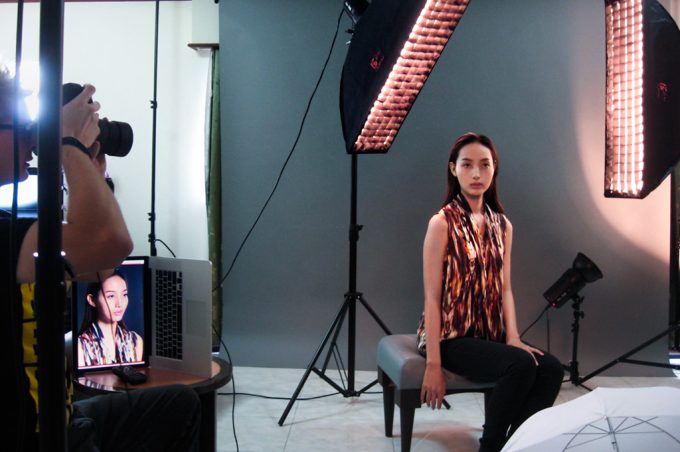
As a result, vertical photos, which are almost the only kind I take, filled nearly the entire monitor instead of just two-fifths of it. OS X doesn't allow you to rotate the built-in screen 90 degrees through software, but the SwitchResX application has this feature.
Eventually, I added an external monitor to the MacBook, the NEC PA322UHD that I've already covered on the blog. At 32", it's large enough for comfortably previewing vertical photos even when it's horizontal. So far I haven't used its PIVOT function, but I may start in the future. I don't take this monitor anywhere, though. The laptop remained my only option for location shoots.
The last stage came recently, when I gave up the computer and monitor. They were replaced by an iPad connected wirelessly to the camera as described in the section about the Eye-Fi card.
I won't take a laptop to another shoot. The iPad is simply much more convenient and lighter.
How do you set up photo preview conveniently?
As the previous section shows, I've tried quite a few photo preview options. My conclusion is this: if the setup is going to work 100% and be genuinely convenient, the photographer can't move around to find different compositions while the monitor stays in one place. It needs to sit on a table or stand that can be moved easily, and wheels are very welcome. You also need something close at hand for controlling the computer so you can conveniently zoom into photos, go back to previous shots, and so on. Ideally, both the camera and monitor would be mounted on the same stand. That's really the only fully convenient solution.
I'd planned such a rig for years, but making it genuinely useful isn't so simple. Sometimes the camera needs to be higher and sometimes lower, so it has to sit on a column with easy height adjustment. A monitor is heavy, which makes the entire rig heavy too. It requires either a stand fitted with a counterweight or just a very heavy column stand, which is exactly what professional studios use. These stands can weigh well over 50 kilograms without any equipment mounted on them. Although this works very well in a studio, it's completely unsuitable for location shoots or shoots done at home. That's why my eventual goal was to use a tablet.
A tablet has several advantages. It's ultra-mobile, and I always have it with me anyway, so it adds no extra weight. Because it's light, you can mount it on a regular tripod that can then be moved without trouble even if it has no wheels. Touch control is also excellent for zooming into photos. With the iPad, you also get very good color reproduction and color management handled by the operating system.
My preview rig
The requirements: the setup must be very light, but stable and convenient to use.

Tripod: Manfrotto MT055CXPRO4 This is probably one of the lightest genuinely stable tripods. It's a solid carbon-fiber design weighing 2 kg. The camera sits on a 35 cm column, which makes adjusting the height convenient. It also has an Easy Link connector, which is simply a threaded socket for a tripod stud. This is very useful because it lets you remove the arm that holds the tablet mount and attach the mount directly to the tripod using that stud. This eliminates extra weight and makes folding and unfolding the tripod easier. The drawback may be the price, which is over PLN 1,500.
Tripod head: Manfrotto 322RC A pistol-grip head for maximum convenience.
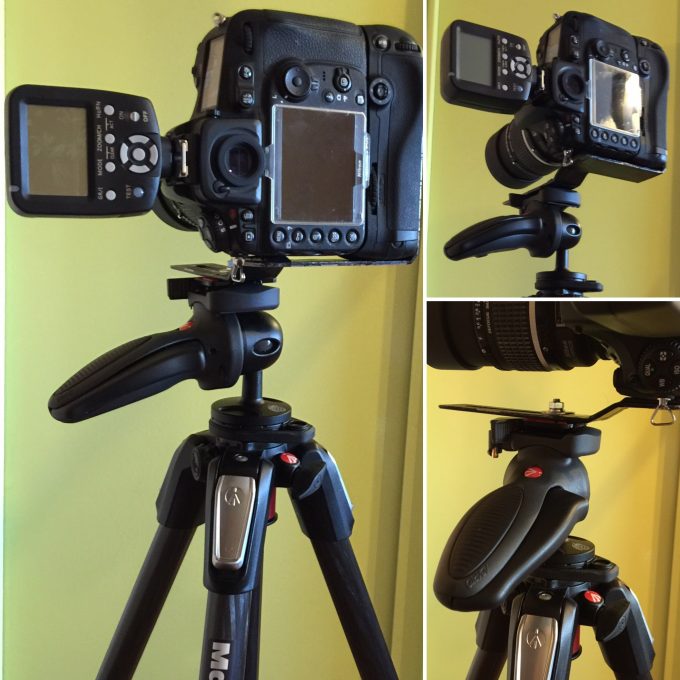
Tablet holder: Hercules DG300 I thought I'd find a holder without any trouble. Instead, it turned out that all of them were huge, often heavy as well, and had impractical arms. The Hercules DG300 is an exception. It's designed so that after removing the arm, you can mount the holder directly on the stud screwed into the tripod, which I mentioned earlier:
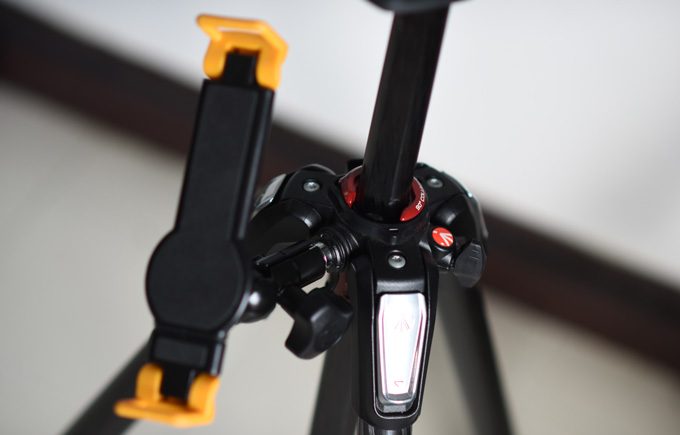
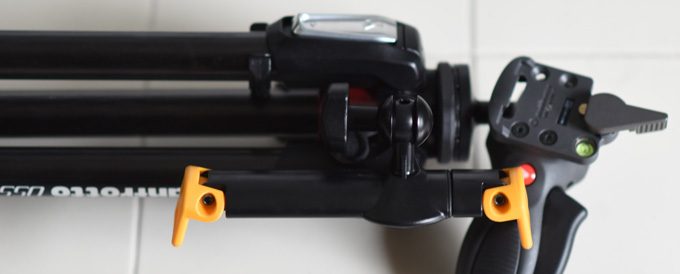
If the tripod didn't have such a stud, the arm is short enough not to get in the way and to remain easy to transport. You can also mount it so that it stays attached to the folded tripod along with the tablet holder:
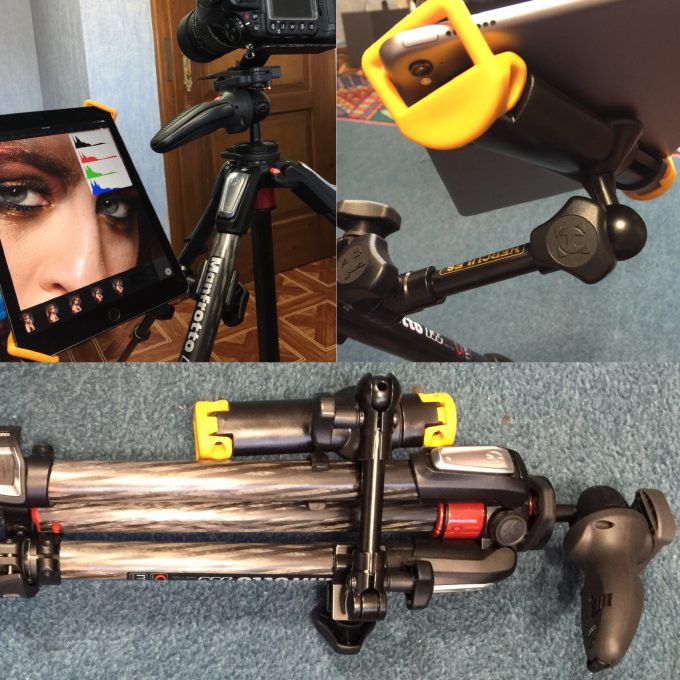
Preview screen: iPad Pro For the reasons listed earlier. I own it anyway, use it for several hours every day, and have it with me at every shoot, so buying a separate device just for previewing makes no sense. If I did need to buy one, though, I wouldn't insist on an iPad, especially the very expensive Pro version. You could easily buy something much cheaper. What matters is reasonably high resolution, good viewing angles, and fast Wi-Fi. Image quality really isn't that important, so most tablets will do.
Additionally… To use a camera with a grip comfortably in portrait orientation, you can't mount it to the tripod in the standard way. Various L-shaped brackets are made for this. I had one at home that I removed from a flash bracket. You can also use a tripod collar for the lens.
The setup above is expensive, but it's a one-time purchase. If weight and portability weren't so important, you could easily build it much more cheaply.
Model vs. screen
In my experience, it's very important that the model NOT see the screen with the photos during the shoot. Unfortunately, this often ends with her trying to look at every shot immediately after it's taken. Sometimes this only makes the shoot longer, while at other times it effectively prevents me from taking the most carefully refined photos.
During a shoot, I often adjust the model's pose in tiny ways, such as moving a strand of hair slightly so it's a few millimeters beside her eye instead of covering it. Now imagine a photo that's definitely going to be published and needs just one small correction. All I have to do is move that strand of hair away from the eye and… the model turns her head toward the monitor to see how she looks… The shot is lost, and the pose can't be repeated. I've never seen a model recreate it exactly from a photo. Small details differ. These are the details that send a photo to the trash instead of publication. This isn't a rule, of course, only my own experience.
Sometimes the opposite is true. If the model looks better with her chin raised high or her lips slightly parted, I show her the differences between the photos, but then I control when that happens.
Summary
Previewing photos as you take them is an incredible convenience. Screen size is definitely not the most important factor. I move constantly while shooting, sometimes closer to the model and sometimes farther away. A monitor would need to be on a convenient table or wheeled stand, and someone would have to keep moving it so I could always make full use of it. That's no problem in professional studios. There, the camera is mounted on an extremely heavy stand together with the monitor, lighting controls, and other necessary accessories, so everything is always within reach. But besides being very uncommon, this solution isn't mobile in any sense. Mounting an iPad on the same stand as the camera causes no problems, is extremely portable, and makes it very easy to move around a photo and instantly enlarge selected areas using the touchscreen. An iPad that's always beside the camera effectively gives you a larger image than a monitor placed far away. And there are no cables tangling under your feet.