This blog post is about Retouch4me, an artificial intelligence used for retouching photos both in Photoshop and as standalone applications. This is an unusual A.I because it has absolutely no competition – it specializes in photo retouching and there is no other tool like this (not on this level – not even close). One mouse click can give such a result, while improving people is only a part of the possibilities.


The result of simultaneous use of Retouch4me Heal, DodgeBurn, Skin Tone, Portrait Volumes, Eye Vessels and Mattifier (50%): A photo downloaded from Depositphotos.
The tools described here will work for everyone – no matter if he is taking a selfies on Instagram or creating fashion magazine covers. I’ll start with that. However, some solutions will be strictly for people who deal with photography on a daily basis and I will go through them in later chapters. I start with the face, but Retouch4me can edit the entire body.
Table of contents
- Introduction
- Retouch4me – hardware requirements
- Retouch4me control panel for Photoshop
- Retouching the skin
- Retouch4me (Heal, DodgeBurn, Skin Tone)
- Beard vs. Retouch4me Heal and DodgeBurn
- Freckles vs. Retouch4me Heal and DodgeBurn
- Extreme Cases (Retouch4me Heal, DodgeBurn) (major update: May 2023)
- Correcting skin color (Retouch4me Skin Tone)
- Photoshop A.I. vs. Retouch4me in skin retouching
- Mattifying for removing glare from the skin (new 2023)
- The performance of Retouch4me
- Eye Vessels
- Eye Brilliance
- Clean Backdrop (major update: May 2023)
- Fabric: Ironing clothes (major update: May 2023)
- Skin Mask (major update: May 2023)
- Portrait Volumes: contouring (major update: May 2023)
- White teeth (major update: May 2023)
- Summary
- How to buy cheaper?
Once, retouching plugins did not excite me – they would destroy photos, blur skin and produce results like those of someone who had just discovered Photoshop yesterday rather than a professional retoucher. I always advised against them because they were so bad. With Retouch4me it’s different – the results can be amazing and at the same time natural. The whole Retouch4me is divided into several plugins/programs used for various purposes: correcting blemishes on the skin, cleaning up studio backgrounds, improving skin color, etc. However, there is nothing stopping you from running multiple plugins at once in Photoshop and after a while having several aspects of the photo improved. I always start up many of them right from the beginning.


The result of simultaneous use of Retouch4me Heal, DodgeBurn, Skin Tone, and Portrait Volumes. Photo downloaded from Depositphotos.
After a one-time purchase (there is no subscription), lifetime updates are also included. I suspect that at some point new customers will have worse conditions, but let’s be glad that for now it is as it is.
The developer provided me with Retouch4me for tests in 2021 and I use it for editing every photo, but after the recent updates, it works even better. In this article, I will summarize my experiences and give some advice on ho to use it and provide tips on how to achieve even better results. I will add that, for example, the Heal plug-in can improve skin not only on a single photo but also on a thousand photos simultaneously, so without spending any time on it at all. Therefore, even for wedding photographers, it will be an incredible time saver (or the possibility of introducing corrections that were not used before). Of course, not everything works perfectly, but if a plugin has flaws, I also describe them in great detail and show how to bypass some imperfections.
Major update: May 2023.
There is a new plugin called “Mattifier” (in my opinion very good). The Clean Backdrop plugin has been greatly improved, now downloading the latest AI model during startup and eventually other plugins will do the same. Heal, DodgeBurn and Fabric have also been improved. Besides being more effective at retouching photos, they can also work faster. In addition to adding new photos, I have updated a large portion of the previous ones to showcase how Retouch4me works in the current version.
How to buy cheaper?
The plugins are only available on the developer’s website, and this is an affiliate link that gives a 20% discount: Retouch4me with a discount. If there was a global promotion, for example on Halloween, the price with this link would be even lower; however, usually these promotions are not worth waiting too long for.
After purchase, you receive a license with lifetime updates for 3 of your computers, so be careful of people selling their additional keys or illegal versions on eBay etc; because then you will pay for a version that you are not entitled to anyway, which means you would simply buy a pirate. Buying on the Chinese and Russian versions of the website is impossible unless you actually live in those countries and have real bank accounts there. It used to be possible to save some extra money, but it hasn’t been the case for a long time, so there’s no point in wasting time creating an Alipay account or converting currencies; because none of it will work anyway. The only way is to enter the website in English and pay in USD (of course, any regular card in any currency will suffice because currency conversion works as everywhere).
Hardware requirements for Retouch4me
The developer provides the following hardware requirements:
- Windows 7 (x64), Windows 10 (x64), macOS: 10.14+
- 6 GB RAM
- 64-bit processor, 1.2 GHz or faster.
- PC: GPU with 4GB VRAM or CPU with OpenCL 1.1 support
- MAC: Intel from 2015 or newer, or Mac with M1
So, PCs that are almost museum objects should still manage, while Macs from the last 7 years. Readers wrote to me that on some Macs sold before 2015 it also works, but of course much more slowly (by the way, I wrote a whole chapter about performance).
Retouch4me control panel for Photoshop
R4m plugins also work as standalone applications, however I use them as plugins in Photoshop. I created actions for Photoshop that simplify their use, and in September 2022 the developer released a control panel that also makes everything easier. Just click on the tool (or select several and press the “Run” button):
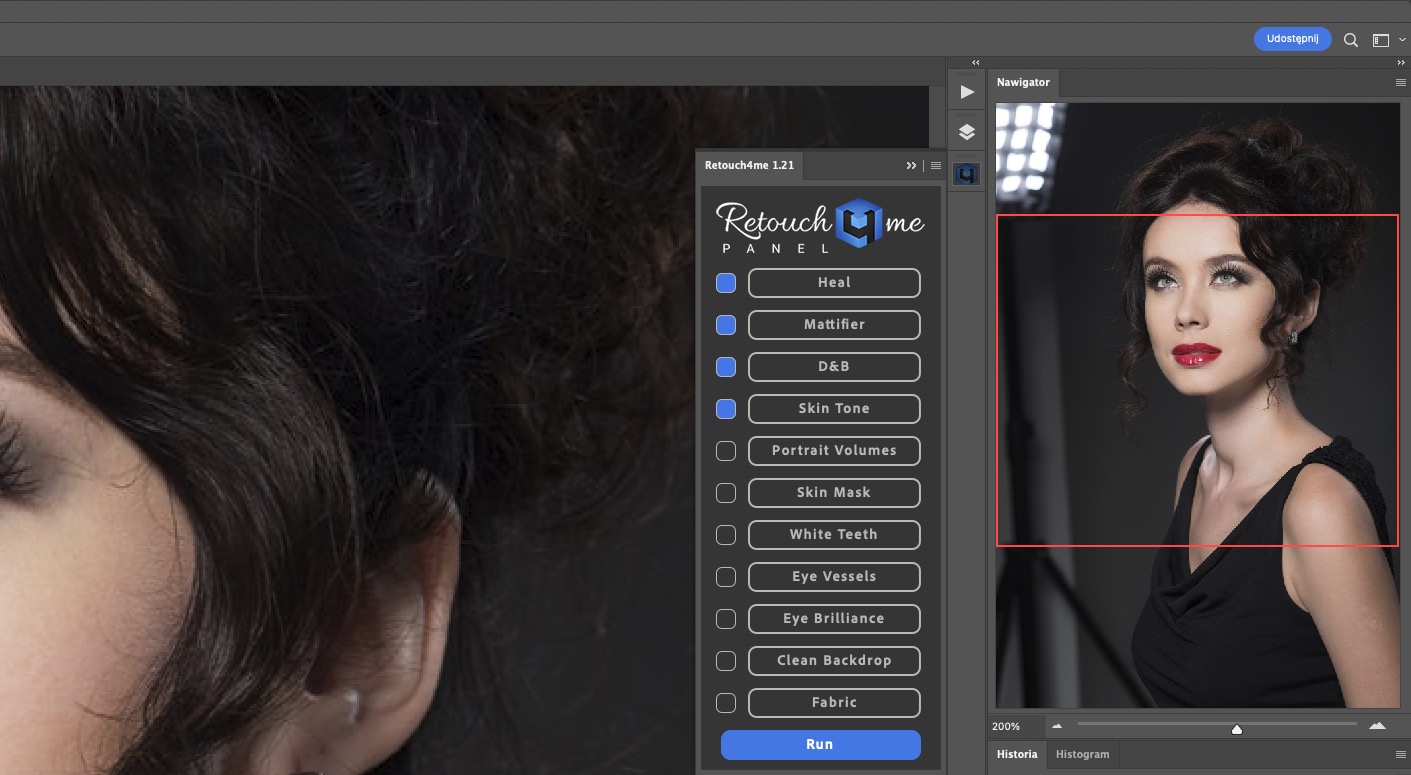
Retouch4me control panel
My actions improve some of these plugins, but regardless of whether it’s with actions or just the panel itself, changes are applied to transparent layers, so you can make corrections underneath them at any time, edit or undo changes without the need to fix everything that was done later. That’s a very important feature. In addition, such layers are very lightweight (they do not increase the file size and do not clutter up the RAM, which is particularly important on older computers). In this aspect, it couldn’t be better.
Retouching skin with Retouch4me – what one mouse click can do
Regardless of the level of advancement, in my opinion, Retouch4me Heal and DodgeBurn plugins are useful to anyone who photographs people, and I consider them a necessary purchase. I highly recommend Skin Tone as well, because over time I see that I use these three plugins on EVERY photo (update: you could also add the newest Mattifier to this group, more about it in the next section). Professionals speed up work and quickly pay for themselves, while amateurs allow you to achieve better results than you would be able to reach on your own without knowledge of retouching. Some of the remaining plugins are more specialized, for example, a plugin for cleaning studio backgrounds would be useless to a person shooting only outdoor scenes, and Fabric (an “ironing plugin”) would not be helpful in a nude photography. Meanwhile, Heal, DodgeBurn and Skin Tone are very universal. Having these plugins, one mouse click can make a huge difference in every photo with a person/people:


Skin blemishes disappeared, as well as darker and lighter spots, which makes the skin look much better, despite the texture being fully preserved. The skin doesn’t look fake, and the coloring has been slightly more uniform (but in this photo there weren’t any visible discolorations so only the color of the neck was gently matched to the face). And this is just the beginning of what can be achieved with a single mouse click, because the possibilities are much greater (you can immediately correct eyes, remove veins from them, remove reflections on the skin, give more three-dimensionality, clean the studio background and more).
Additionally, the photos can be full body or group shots and Retouch4me will detect the people and improve them all (in their entirety, not just faces like the built-in Photoshop filter, which by the way is so terrible that no one should use it – I’ll demonstrate this later).

The detail was preserved and the blemishes on the skin disappeared (along with freckles – if needed, they can be restored by masking the layer). The skin did not blur, as corrections were made using the non-destructive dodge&burn method. The color has been adjusted (again, only slightly and imperfectly – the torso still differs from the face quite strongly, but it’s due to brightness rather than color). The face has also been color-corrected. Adjusting the colors done with Retouch4me Skin Tone plugin is often too intense, but by changing the layer opacity, I can adjust the color. After applying these plugins, skin corrections are usually no longer necessary in portraits, but in high-end commercial photos, it is a good starting point for further work.
To achieve such a result, I used 3 plugins: Retouch4me Heal, Retouch4me DodgeBurn and Retouch4me Skin Tone. The names explain everything – Heal fixes blemishes that we would normally use a healing brush for, so anything resembling pimples, moles, various small but noticeable spots. DodgeBurn does a method… dodge&burn, which removes slightly brighter and darker spots on the skin, making the figure look better while fully preserving the texture of the skin. D&B (Dodge and Burn) is one of the most important stages of photo retouching, but because it normally takes a lot of time and requires a lot of practice, some people opt for more destructive methods that don’t give as natural results.
On the left, there is a Retouch4me window with a visualization of what the Heal plugin has corrected, and on the right, DodgeBurn.

However, I never look at the Retouch4me plugin windows (I have actions for each plugin, of which one skips the plugin window and is almost always what I use. The control panel for Photoshop also skips these windows, so when we click on them nothing appears, the image simply looks better after a moment with new layers). Besides, the options available in these windows almost always work best on standard settings, and if needed, you can always change the layer opacity to adjust the strength of an effect such as Skin Tone filter. The exception is a plug-in for cleaning the background and Skin Mask, which is where this window comes in handy, but more on that later.
Skin Tone uniforms skin tone – it does not change the white balance, adjust the brightness of legs to match that of the face, etc. Simply adjusting the color to make the skin look more consistent across different parts of the body.
Below is another photo with just the skin corrected (Heal + DodgeBurn), without the plugin responsible for colors (Skin Tone), because they were already fine from the start.
If you can’t see some pictures, it’s the fault of adblocker. For an unknown reason, a lot of before/after sliders aren’t being displayed. My website doesn’t have any ads, so disabling your adblock won’t negatively affect its appearance.


For people with worse skin or those who are not prepared for the carefully applied makeup in their photos (or just for regular pictures, and not professional photo shoots), the Retouch4me Heal and DodgeBurn plugins save a lot of time. However, if the characters are already well-prepared before the photo session and we want them to look even better in photographs, part of what Heal does is eliminated beforehand through makeup. Then automatic DodgeBurn will save us a few minutes on each photo. However, when it comes to advertising photography (especially beauty), dodge and burn technique is done for much longer – often for hours. Retouch4me won’t do it all for us. To delve into small details, we must do it manually. In that case, I start with the R4m plugin and continue in a traditional way.
Of course, we will save the most time when the character has a lot of blemishes on their skin, but then we also need to fix more places manually.


The character generated by A.I. DALL-E 2.
Where there were the biggest imperfections, there are still textureless spots that will be worth correcting with a healing brush.
Freckles vs. Heal and DodgeBurn
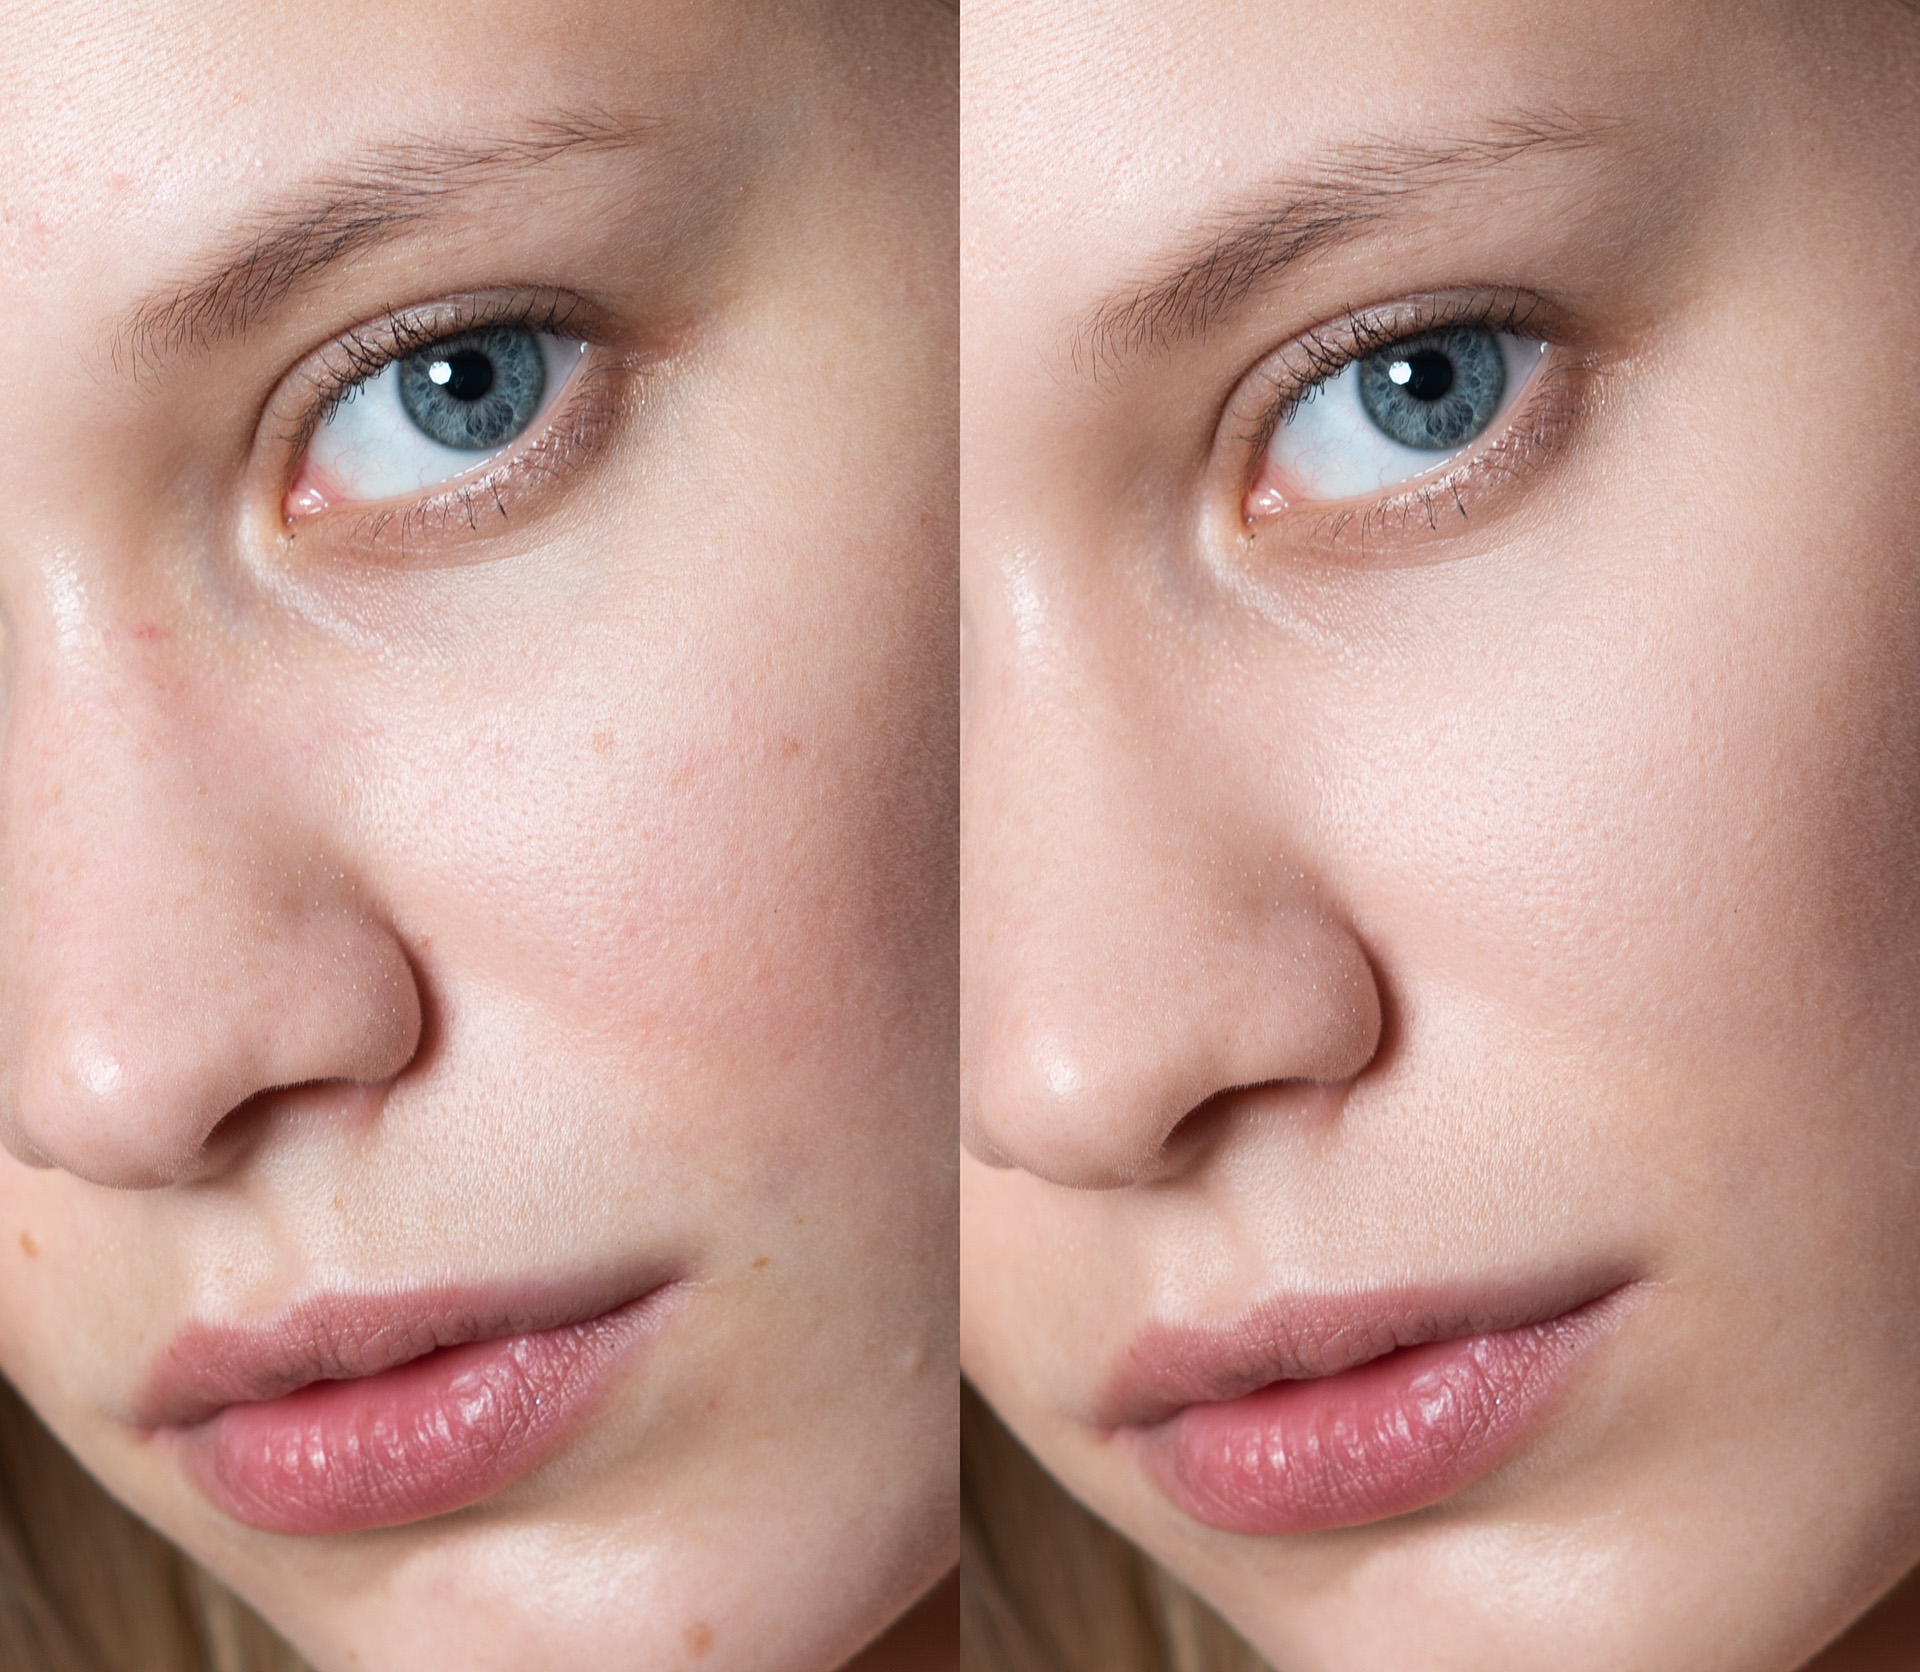
Freckles are so diverse that it’s hard to generalize, but it can be assumed that the strongly distinctive ones are removed and the rest remain. But I have to illustrate it with different examples. There don’t seem to be any blemishes to fix in the first one, so it would be ideal if the “before” and “after” photos were identical, but they differ a bit.
Only Heal:


A photo downloaded from Depositphotos
Only DodgeBurn:


A photo downloaded from Depositphotos
Not many delicate freckles, Heal + DodgeBurn + Skin Tone:


The Heal plug-in removed almost all freckles, DodgeBurn did almost nothing. In the following example, similarly:

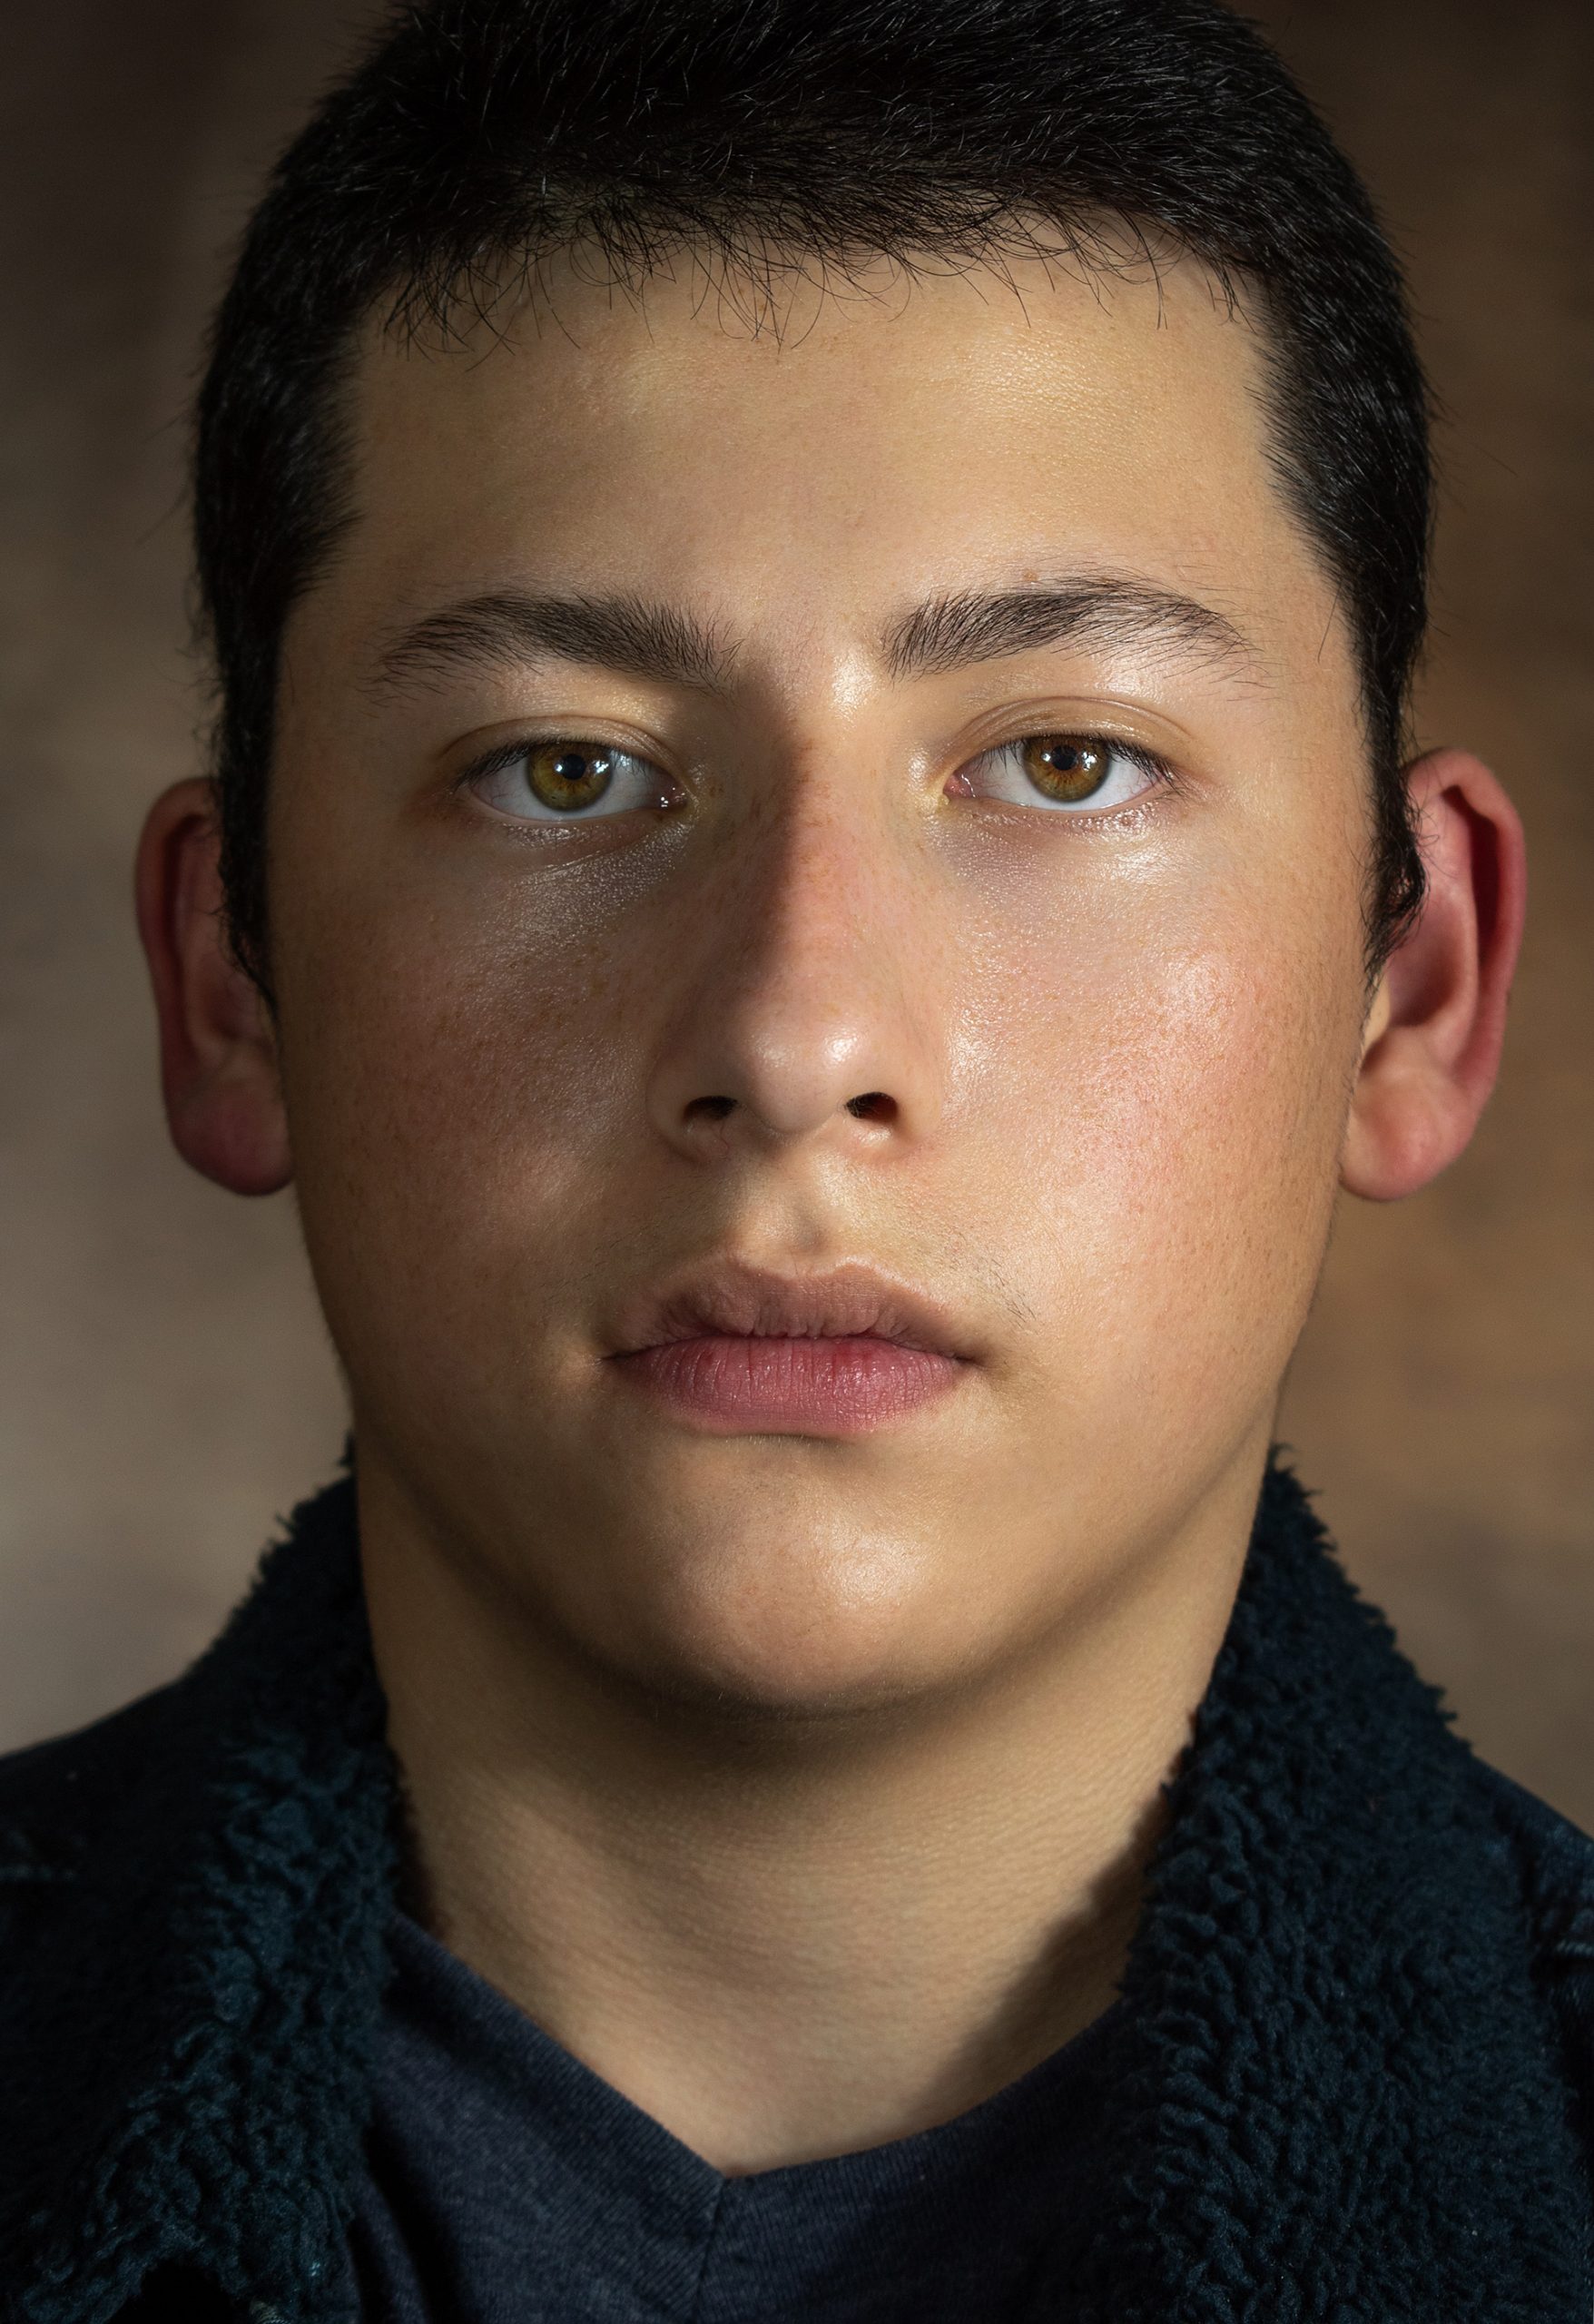
Photo downloaded from Pixabay
So it can be assumed that removing freckles is mainly a feature of the Heal tool, not DodgeBurn, which of course makes sense, so I will focus specifically on the Heal:
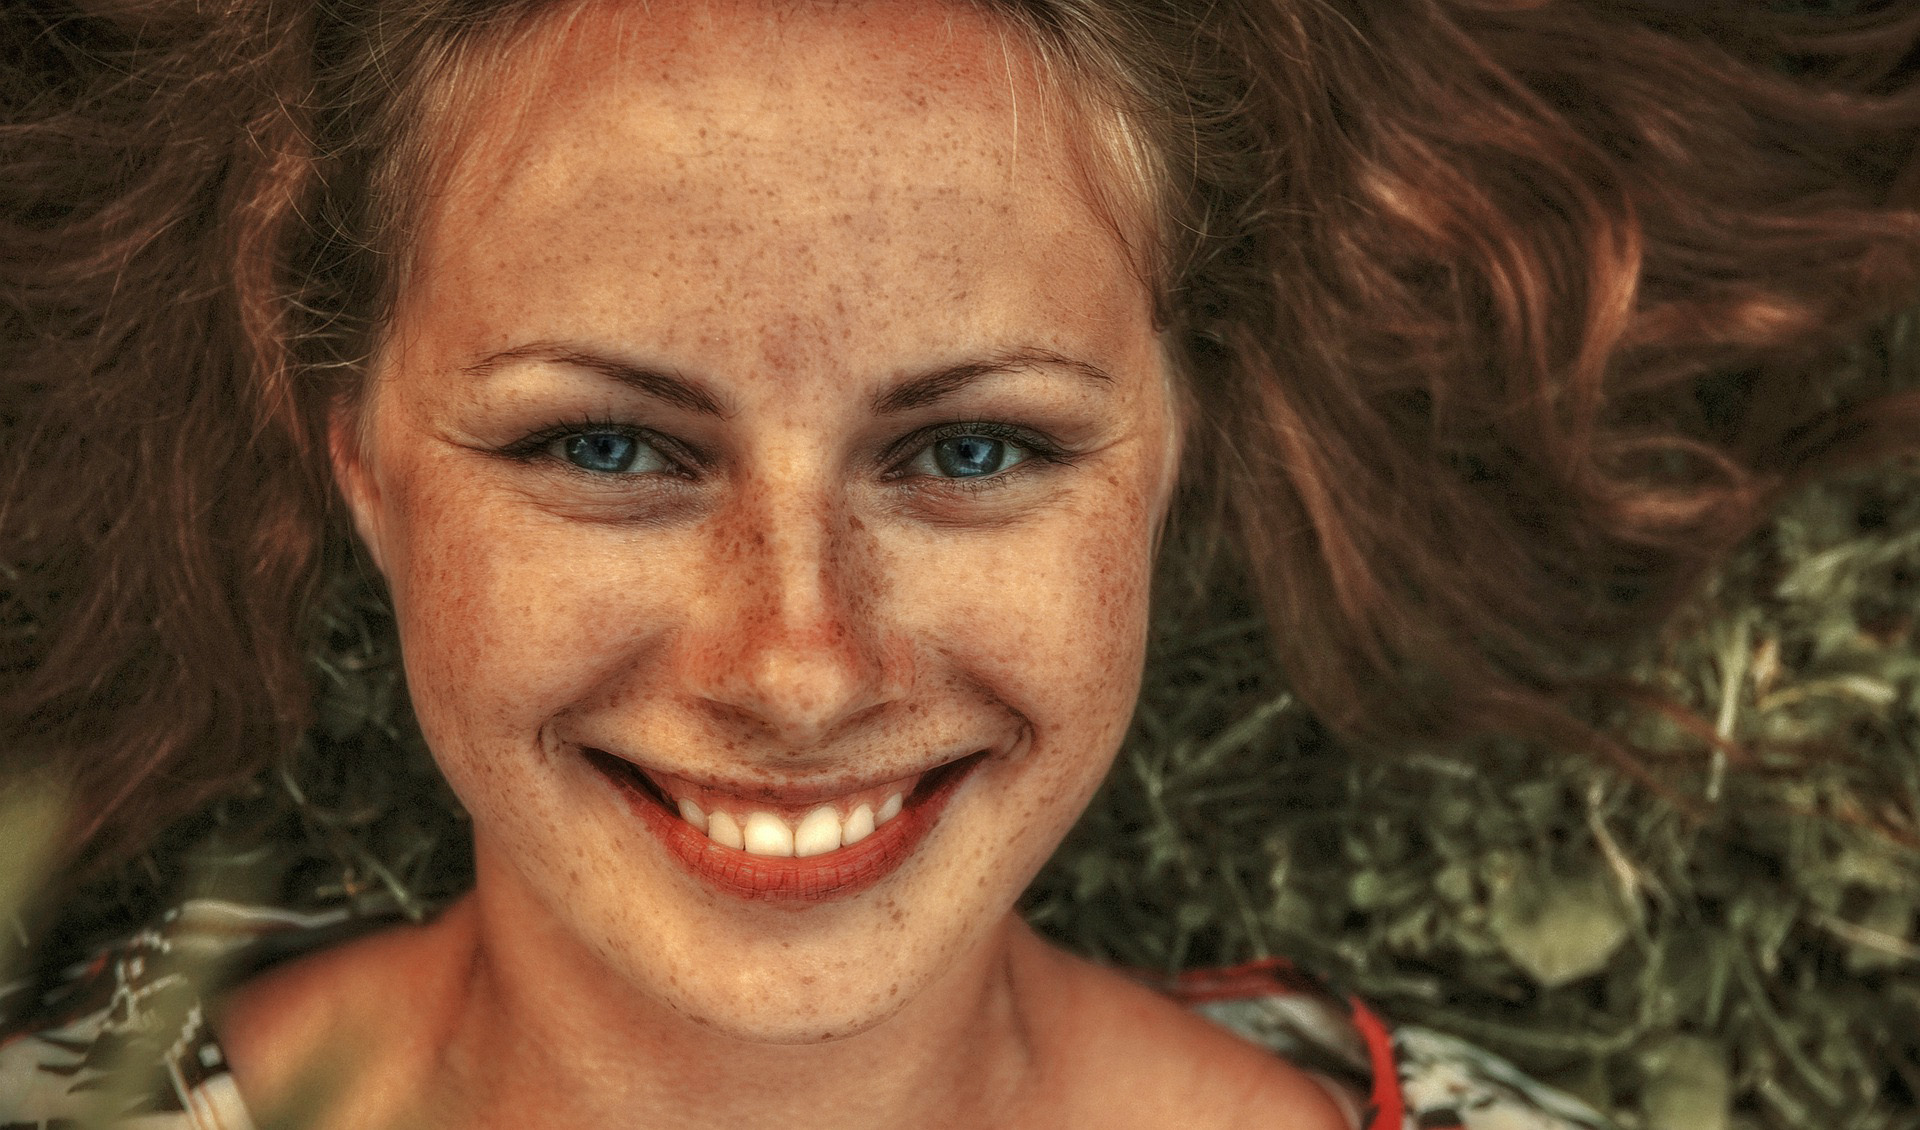

A photo downloaded from Pixabay


A photo downloaded from Pixabay
Beard vs. Heal and DodgeBurn
Facial hair is not a problem for these plugs:


Neither Heal nor DodgeBurn smudge the beard or blemishes on the skin, as was evident in all of the photos I tested. Perhaps sometimes there was a lightening of some hairs, but it was visible only when directly compared before and after. So I have nothing to complain about.


The character generated by A.I. DALL-E 2.
Extreme cases (Heal and DodgeBurn) – major update: May 2023
As a curiosity – what happens in extreme cases? Then Retouch4me is not enough. This is R4m Heal + 2 x DodgeBurn on very damaged skin:


A photo downloaded from Depositphotos
Manual retouch allows for much better changes, but if I had those plugins when I was correcting this picture manually, it would take CONSIDERABLY less time. One more extreme example, this time using Retouch4me Heal + double DodgeBurn + Skin Tone:


A photo downloaded from Depositphotos
There are still many areas for improvement visible and the texture of the skin in some places does not match that around it, however:
- There is much less work in continuing from this point than starting from scratch;
- No one will probably do such a drastic editing;
- There is nice progress between how R4m did it now and two years ago.
Correcting color (Skin Tone)
I already mentioned the Skin Tone tool, but I’ll remind you that it’s a plugin for uniform skin tones, not for correcting white balance etc. It is trying to make sure that the skin on her entire body has a consistent color. The less prepared a person is for photos, the bigger difference Skin Tone will make. Therefore, amateurs will save more time than photographers working with a whole team working on the photographed people. During photo shoots, makeup is often applied not only to the face but also to the neck or hands if they are exposed in the photos. At that time, Skin Tone has a bit work to do, but even more when taking pictures without such preparation:


The character generated by A.I. DALL-E 2.


The character generated by A.I. DALL-E 2.
And something from the example of my test photos, which in my case are also often taken without a makeup artist but with makeup done by the model and under more controlled conditions (and with people who have more uniform skin…) In the photo below, I presented skin retouching, and now I will leave it and just adjust the color.


The area below the nose no longer has a different color (yellowish), and the cheek is not as red anymore. The hand also doesn’t stand out so much in terms of color. However, in photos of models, the effect is often too strong on their cheeks and they lose their natural blush. Exactly what happened in the above example. On the other hand, in portraits with a lot of blemishes, despite being strong, the effect seems quite natural. Regardless of the situation, we can reduce the strength of Skin Tone by adjusting the opacity of a layer. And I demonstrate examples at full power to precisely illustrate the standard operation of this plugin.
Very occasionally it happens that the coloring is too weak:


Then it remains to manually adjust the legs to better fit the rest of the body. However, here the difference actually arises not so much from the color but from the brightness. Because Retouch4me in the latest versions corrects the colors of the photo on a soft light layer, a significant change in brightness will be possible while coloring. The question is whether the developer will decide to do so.
Photoshop A.I. vs. Retouch4me in skin retouching
Unfortunately, the artificial intelligence built into Photoshop is still terrible and one cannot expect results like those from Retouch4me. Colorizing black and white photos is done well by Adobe’s A.I., but improving skin is an nightmare. After my many years of experience with Photoshop, I don’t believe that it will ever come close to the results that Retouch4me provides today. Moreover, I have an example that not only compares both solutions but also their development…
February 2022:
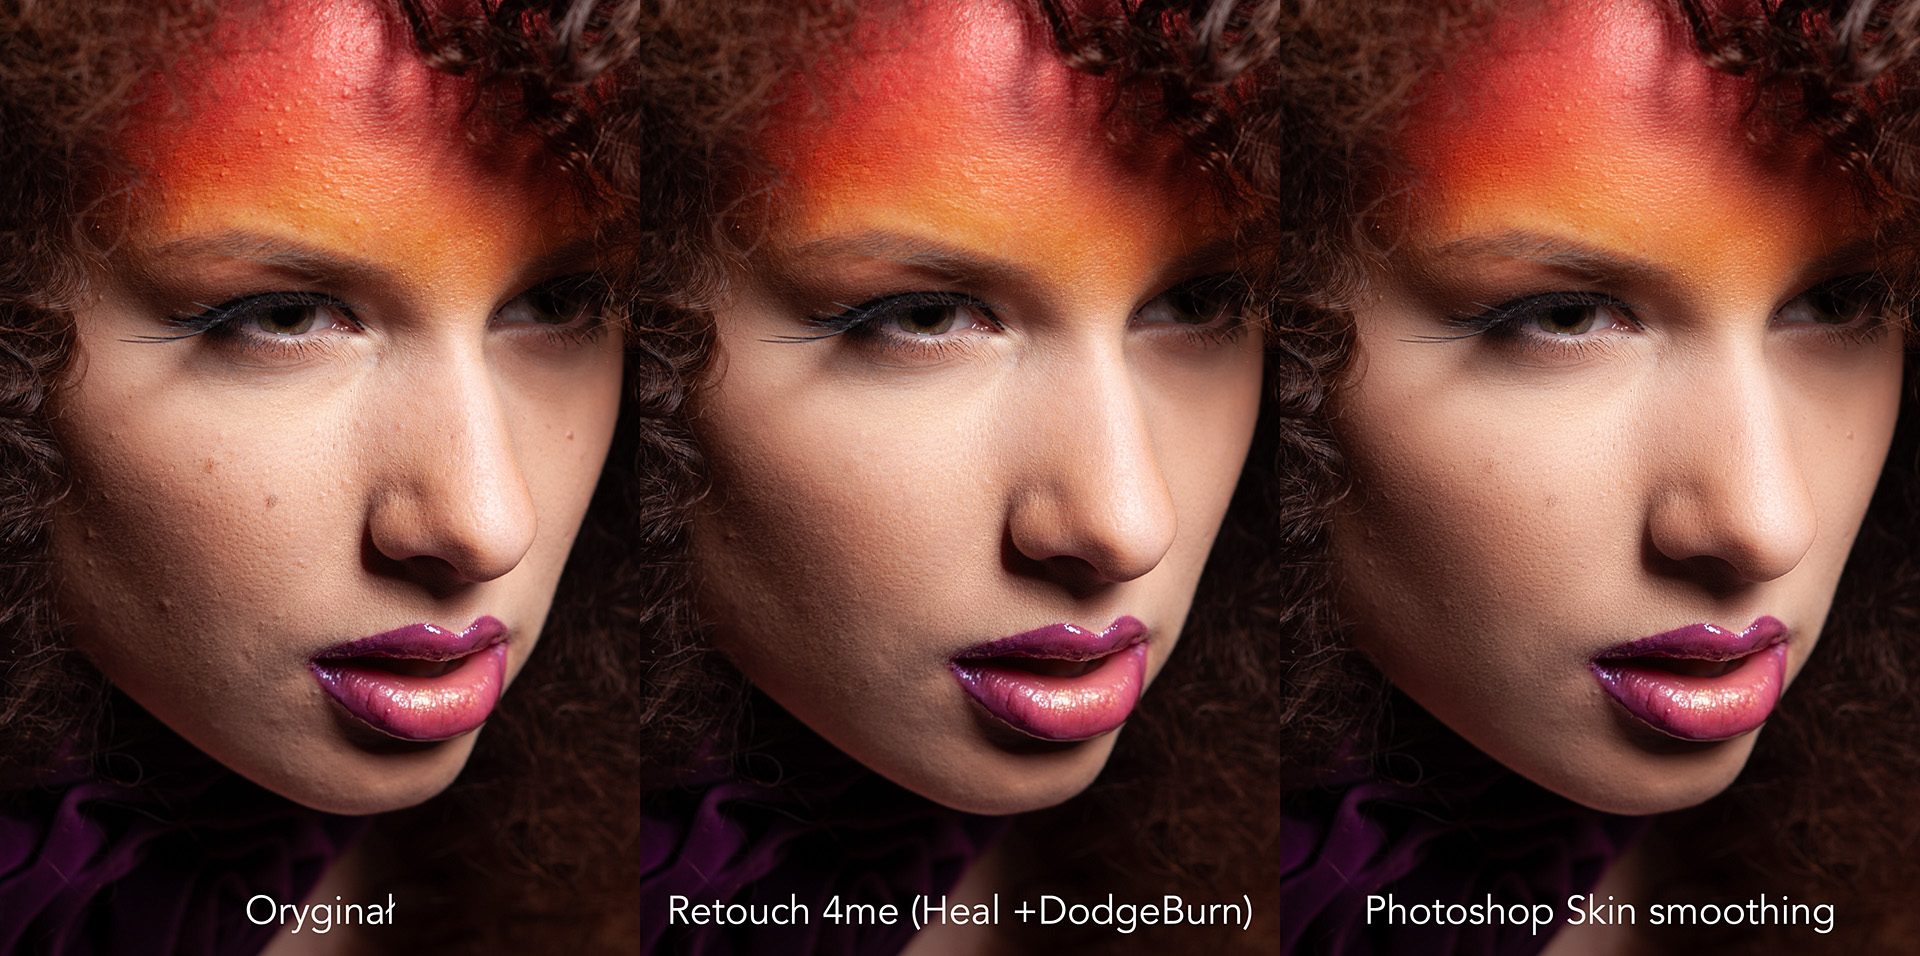
September 2022:
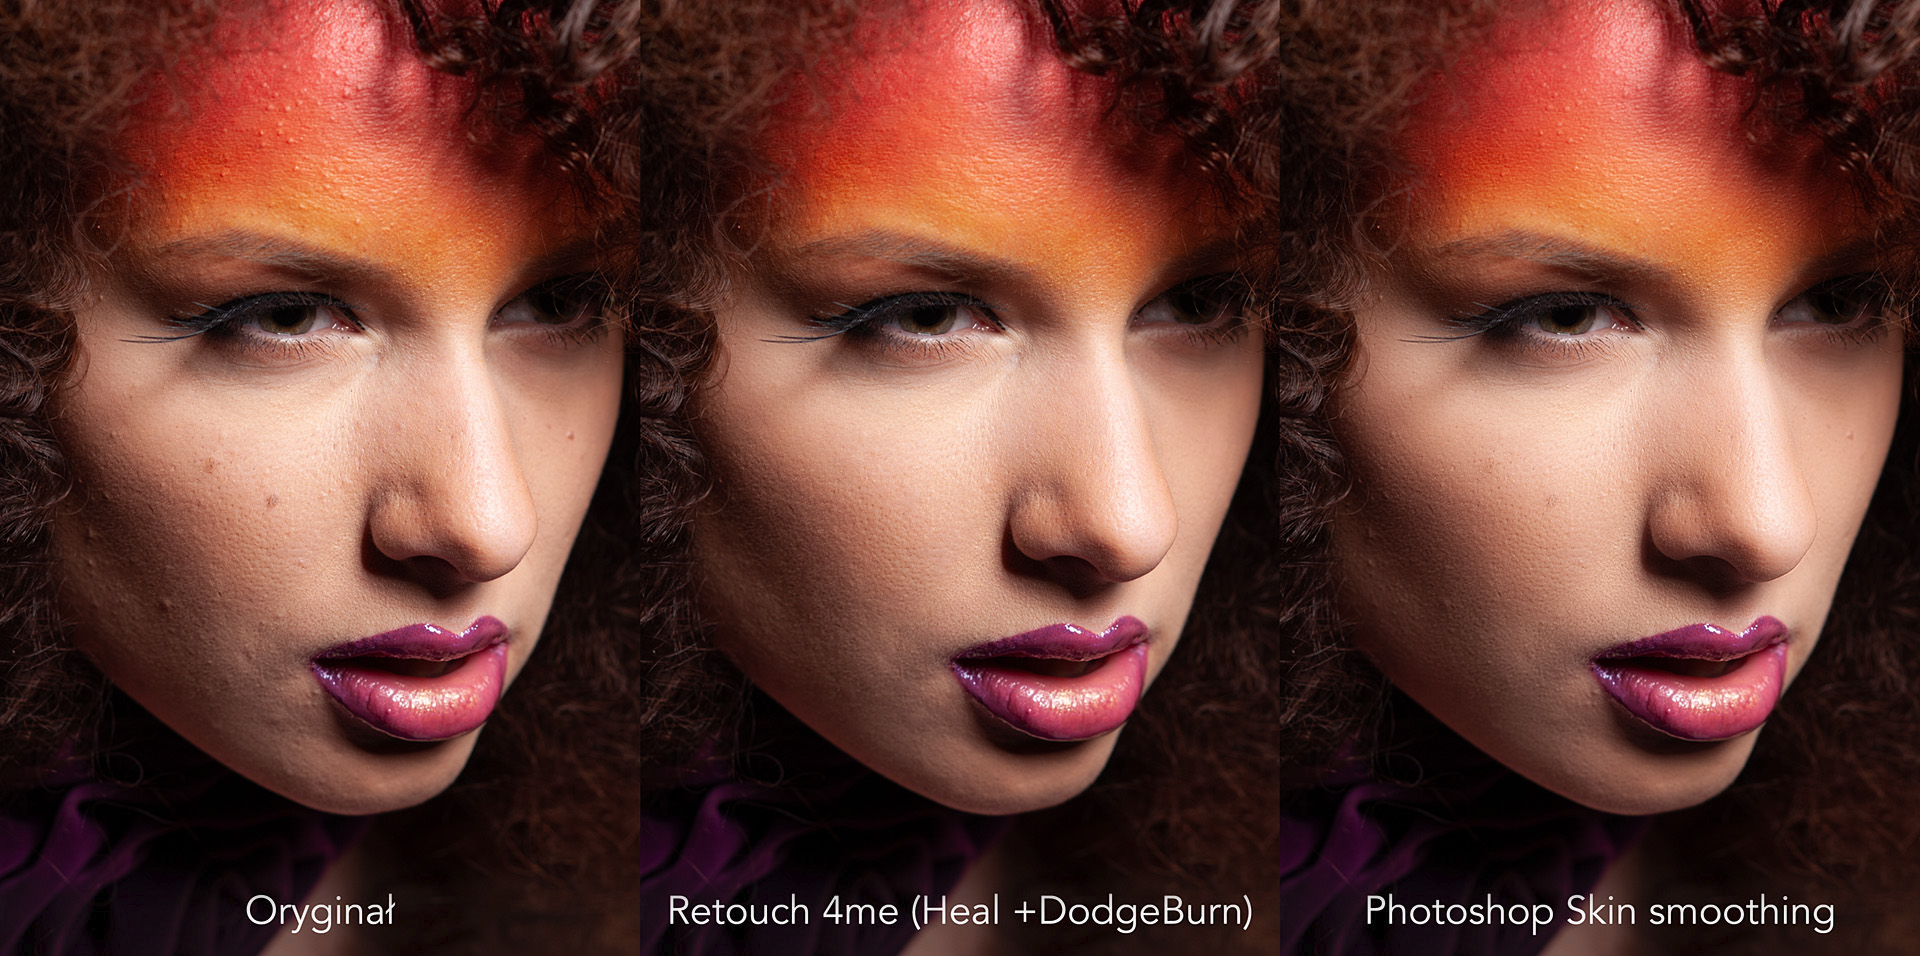
Heal significantly improved skin more accurately than in the previous version, while Photoshop’s Skin Smoothing destroyed the photo just like before. The photo is beyond saving – if I continue retouch, it doesn’t matter what I do, the end result will be terrible because the skin has been heavily blurred. No one who has even a little experience in retouching would do something like that. However, Retouch4me left many areas untouched, but it didn’t blur anything and I can continue working on the photo calmly from this point forward.
May 2023:


Retouch4me Heal + DodgeBurn
While in case of portraits, agency tests or business photos, after using R4m plugins there will be little work left, in case of beauty shots there will will still be quite a bit. Retouch4me DodgeBurn improves the skin without going into very fine details and sometimes also skips larger details.
In other types of photos besides beauty shots, the superiority of R4m over PS neural filter only increases dramatically, so the example above was very lenient for A.I. Photoshop because it ONLY works on faces, while Retouch4me improves the entire person (and if there are multiple people, it will work on all of them).
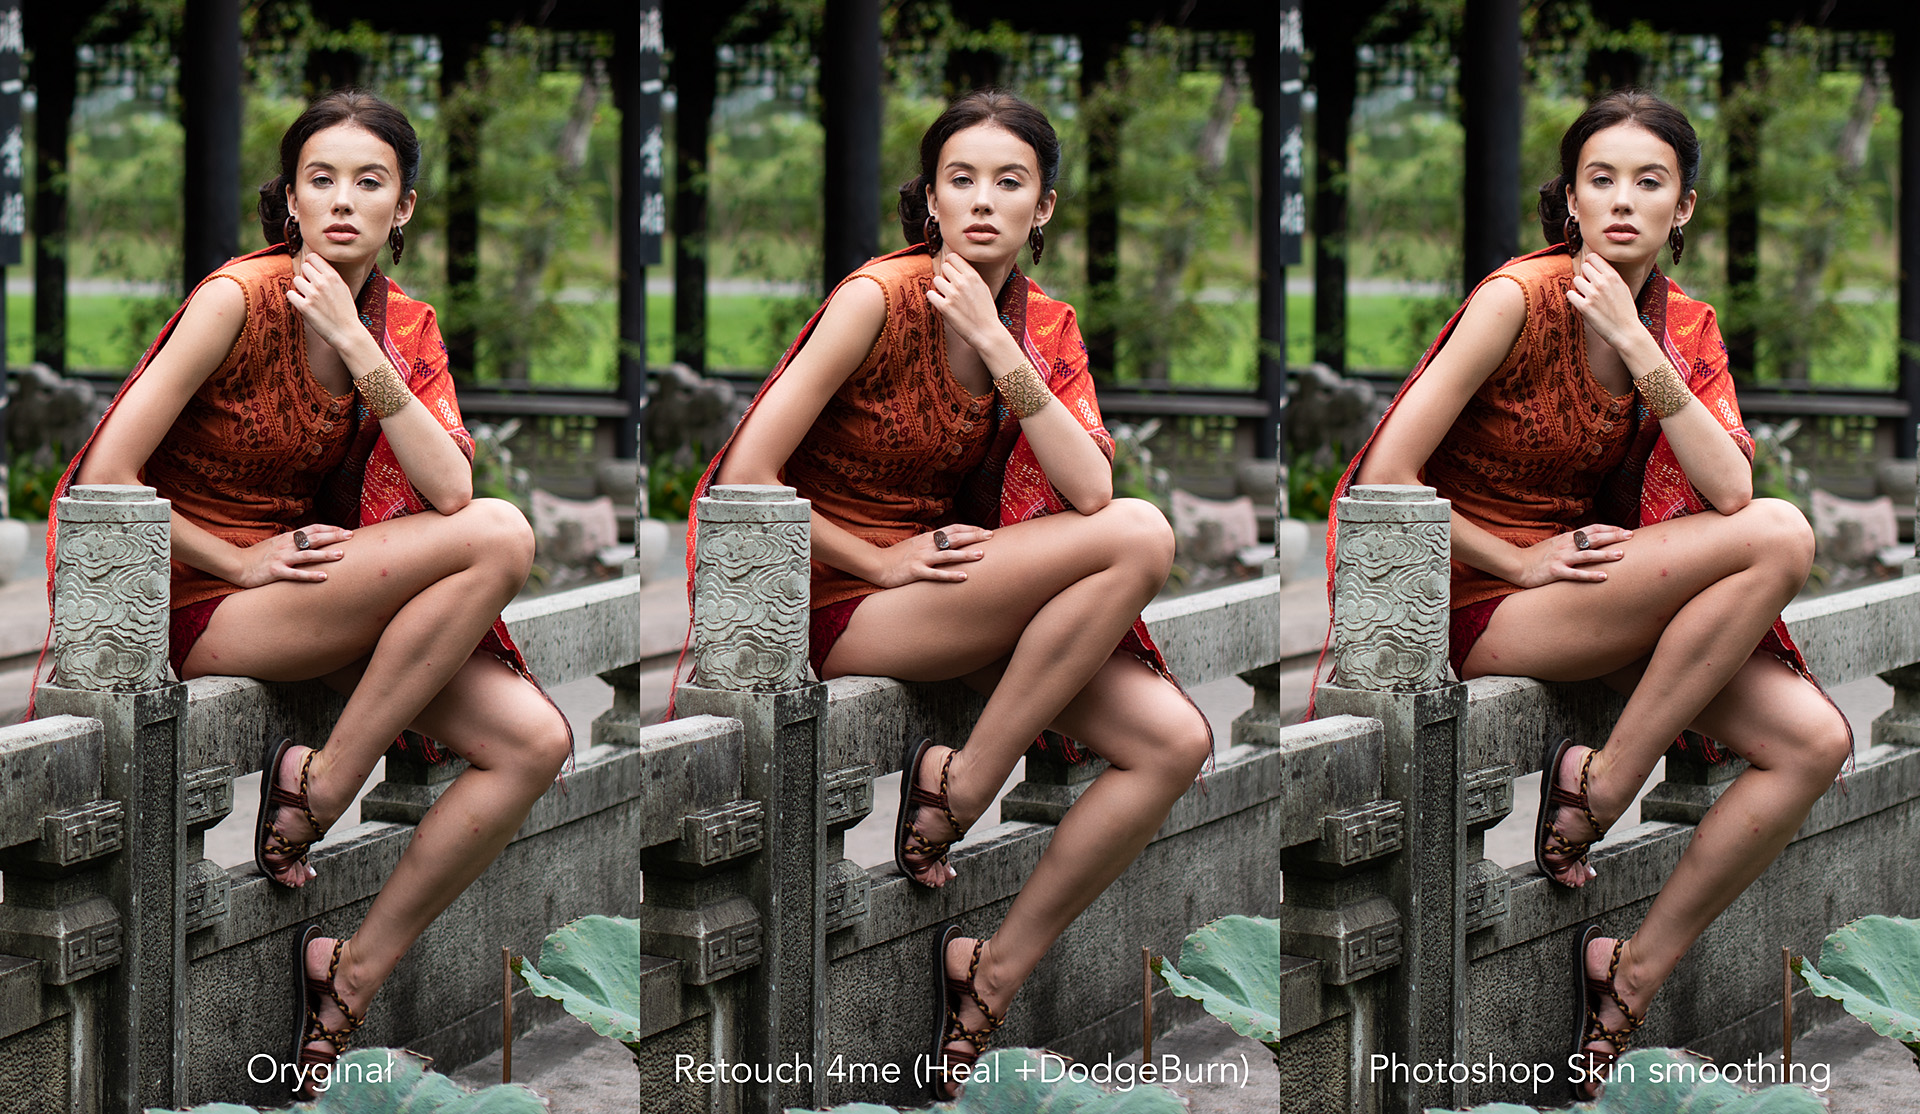
The Retouch4me Heal and DodgeBurn effect looks like this up close:


Of course, the R4m developer could teach the neural network how to specifically deal with these photos that demonstrate the progress in Retouch4me development over the years. In their place, I would do it this way… However, I never publish first impressions, instead I write down observations after long use and verify everything on a multitude of other photos. I don’t see any discrepancy between them and the ones in the article – if the photo from the article is better retouched in the new version, then completely different photos, but with similar problems, are also being retouched better.
Mattifier (new 2023)
This is the latest Retouch4me plugin. Mattifier removes light reflections from the skin, such as oily areas that reflect too much light or those created by too little powder or a lamp placed too close to the subject etc. In addition to darkening the area being corrected, it is also colored so it looks natural.


Normally, reflections are removed very strongly, but it’s good because we can adjust this effect by changing opacity of the layer. Typically, I would restore only half of the “flash”, but in this case I am showing how it looks with maximum settings so that you know its full potential.


Once I used to remove any light reflections from my photos and then I would use this plugin for every session (the beginning of my retouching course (only in Polish) already explains how to manually eliminate such areas). Today normal light reflexes no longer bother me, but there are also those that everyone hates – I mean those in bright sunlight, or in a photo-reportage where you don’t have full control over the light, where not everyone has powdered faces and often you need to flash a lamp up close. Light reflections are strongly contrasting, making the skin color disappear in them, but manually correcting this is cumbersome and too time-consuming for an entire series of photos.
Note – Mattifier does not equalize the brightness of the skin throughout the photo, nor does it act as a polarizing filter on glasses etc.


Photo by Piotr Woliński
As you can see, the color of dimmed reflections on the skin is perfectly matched, although the color is rarely different (I had it happen during one session and after reducing the layer opacity, the color matched, but at 100% it was too intense on the shoulder):


However, usually even in places with very strong light reflections, the color matches:


A photo downloaded from Depositphotos


Zdjęcie pobrane z Pixabay
Retouch4me performance
I assure those who tested these filters long ago that they now work much faster than at the beginning, because they use acceleration, so probably no one will have a dodge&burn lasting 5 minutes. On my PC (i9 9900K, RTX 3090, 32 GB), dealing with 36 Mpix photo is not an issue. 10 seconds for the Heal and DodgeBurn filters, slightly longer for Skin Tone. The 12 Mpix image processing time is shortened to approx. 6 seconds. I almost have no difference in time between different photos, as long as they are the same size. I count the time for everything my action does – creating a layer with the entire image, running a filter, changing the blending mode of the layer, etc. There is definitely still a lot of room for optimization because my computer resources while using Retouch4me are largely unused. Moreover, Heal should be done much faster than DodgeBurn and on most configurations there is a difference – this is another indication that in the future we can expect optimization, which apparently is already very good on machines with M1. Czornyj wrote to me about such results: M1 Pro 16c, 36MPix: DodgeBurn approx. 4-5 seconds, Heal below 2 seconds (on my M1 the heal also works instantly).
Interestingly, Retouch4me also works on a computer that does not meet the minimum requirements (Mac computers from 2015 are listed as the minimum), but of course very slowly. Here’s what one of my readers wrote about their MBP 2014 i7 2.5 GHz, 16 GB, Intel Iris Pro: “I bought Heal and DodgeBurn. Healing takes about 40-50 seconds for a 50 MB file. D&B takes around 2-2:10 minutes. So it’s slow with D&B but it still speeds up the work significantly.
Removing Eye Vessels
So far, I mainly discussed 4 plugins (Heal, DodgeBurn, Skin Tone and Mattifier), but the possibilities are greater than just retouching the skin – for example, you can automatically remove veins in the eyes.

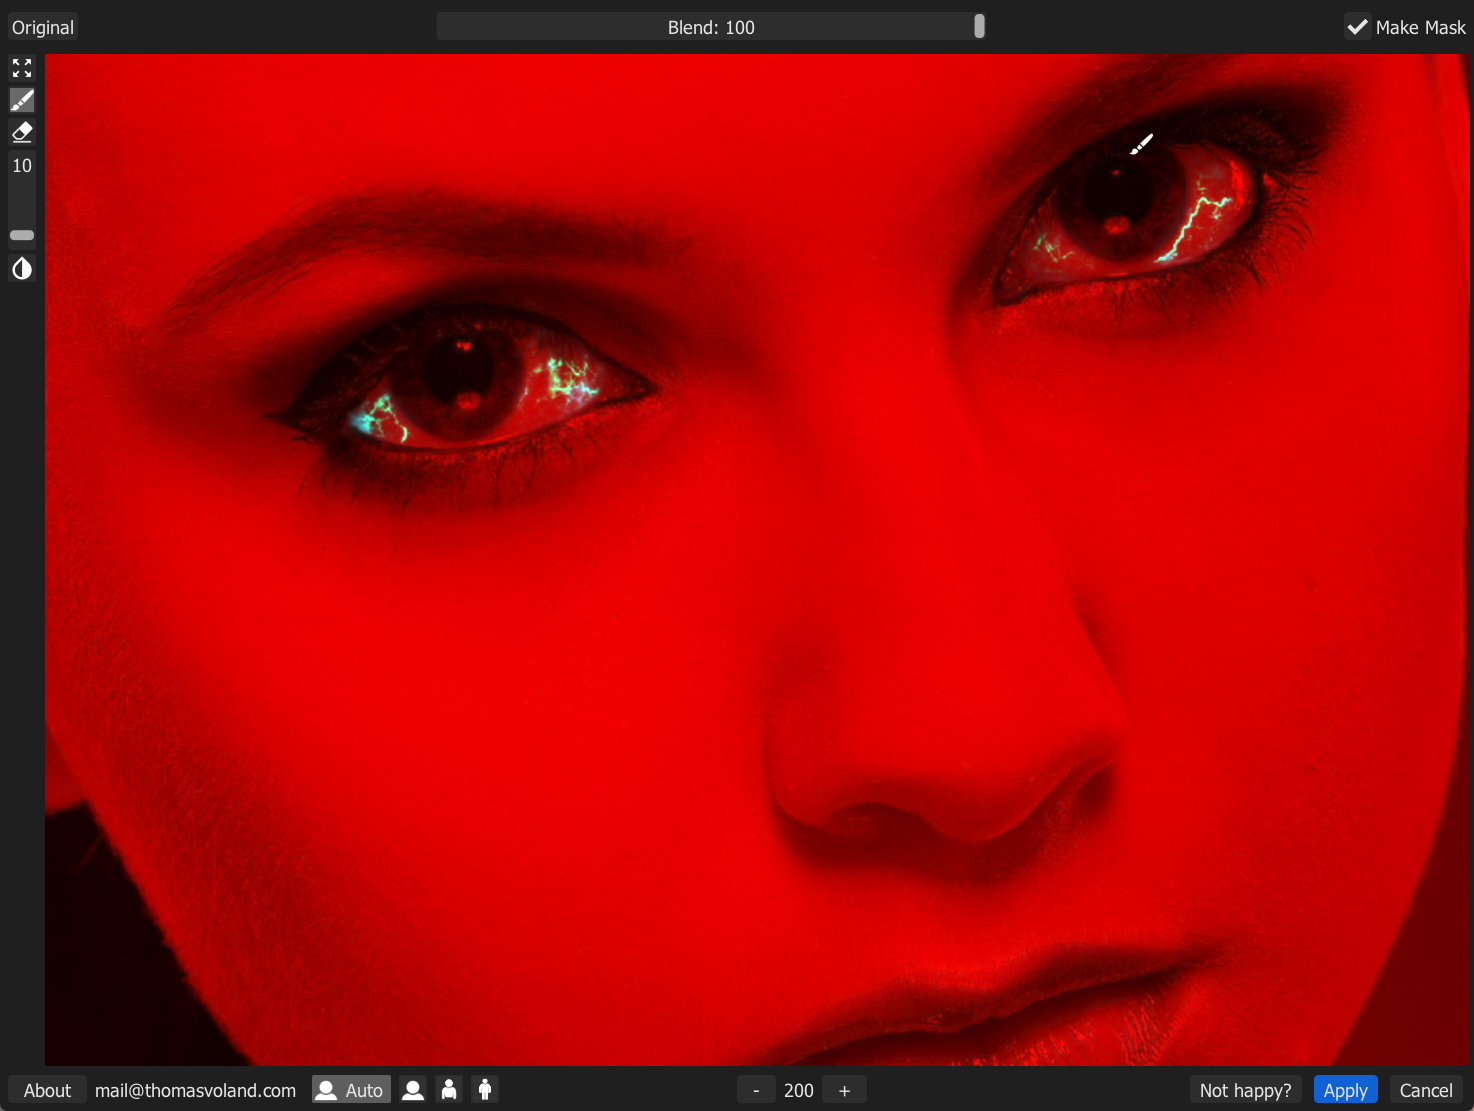
The Retouch4me Eye Vessels plug-in is used for this. It turned out well, but to perfection the color of the white in the second eye needs to be corrected. The effects of this filter are various – sometimes excellent, occasionally barely noticeable, and most often good but often leaving the mentioned color-smudges.

And an extreme case:

In the last example, an additional unnatural halo effect can be seen around one of the veins:

This filter performs best with sharp edges that would be difficult to correct manually. I can fix the left color-stain quickly, so it saves a lot of time. When a character is smiling, it often happens that the eye vessels brighten fragments of teeth, so there is room for improvement.
Eye Brilliance – Improving the appearance of the eye
In the Eye Vessels package, you also receive a second plug-in (meaning that you don’t have to pay for it separately, as we always get both): Eye Brilliance, which is supposed to make your eye more “alive”, contrasted and brighter. In practice, it often looks as if the brightening brush painted over the eye, leaving some areas untouched while going outside of others. Sometimes it also brightens the part of the eyelid and the incomplete eye, etc. It works so badly that usually I don’t use it.


Both eye plugs used simultaneously:

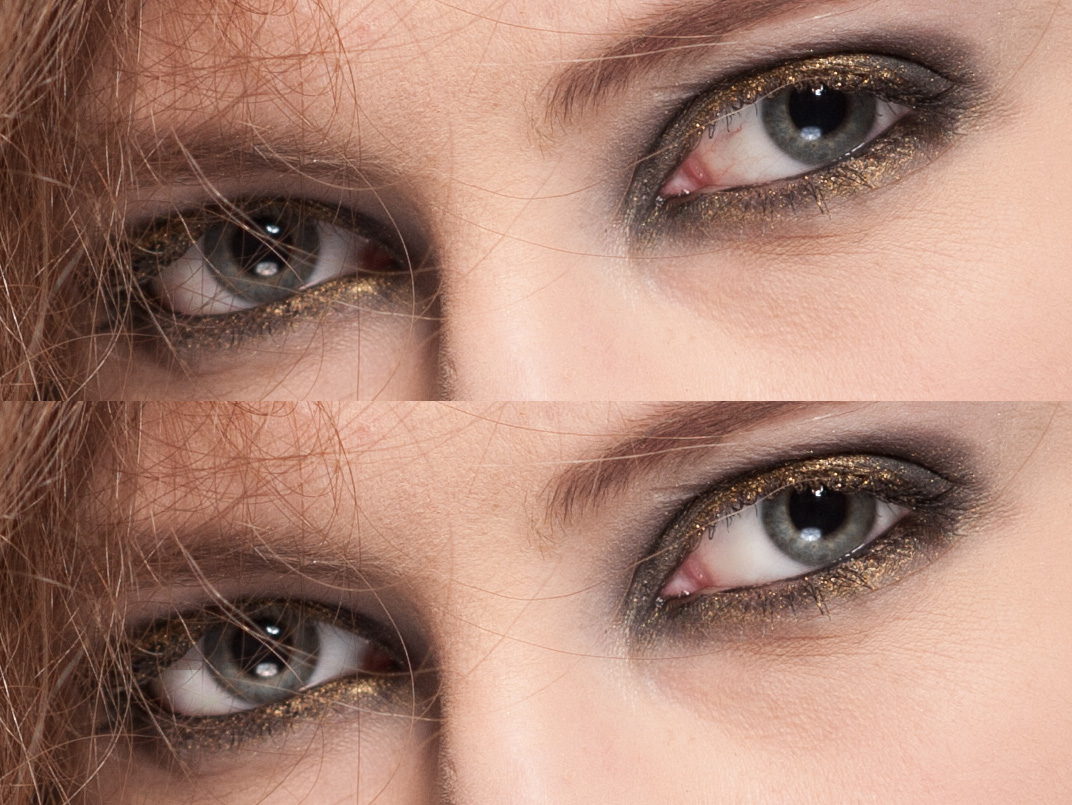
In the above picture, edge detection of the eye was incorrectly performed, but this does not normally happen. However, very often manually adjusting the contrast and brightness of the eyes gives decidedly more natural results. So it’s worth buying the Eye bundle because of the Eye Vessels alone and treat the Eye Brilliance as a bonus that may or may not be useful in future versions. If Eye Brilliance was sold separately, I would definitely discourage it.
Clean Backdrop (major update: May 2023)
Another great time saver, additionally greatly improved in 2023. Currently, it handles even better the correction of ridiculously dirty background and there are no more white artifacts that rarely occurred before. The latest AI model is now downloaded automatically from the network unless we uncheck the following icon:

The Clean Backdrop plugin removes dirt from the studio background and minor dents. It also makes the background more even, while preserving natural noise in the improved areas. Therefore, the structure of the corrected fragments is consistent with the rest of the background.


This is the only Retouch4me plugin in which, in my opinion, it makes sense to use the window panel. It is possible to choose the size of the corrected elements and enable “Automask”, which means detecting a person to not damage it. This should not be confused with the “Make Mask” option, which makes changes to an empty layer – I always have this last option enabled in every R4m plugin.


There is still something to fix, and it used to be like that in many pictures. However, with the current version of the neural network, such cases are much rarer and usually only minor details need to be corrected.


Sharp shadow from the rim light was considered unwanted. I would probably leave the above, but truth be told, when I get a really sharp shadow from a rim light without any applied modifier, I often try to soften it too.
When there is a lot of skin, sometimes its fragments blur. Although the plugin has an option to detect people (“automask”) and bypass them, it simultaneously reduces the effectiveness of background correction – not always, as it depends on the photo, but with large stains, the difference in background correction can be significant. So, the simplest way is to use plug-ins with standard settings and If necessary, mask the person. However, it has also been greatly improved in the latest update.
However, I came up with a different way – we can use the subject selection option in Photoshop CC, which detects and selects the person with just one click. Then all we have to do is invert selection, turn on R4m Clean backdrop plug-in, invert selection again and remove the person from the layer. However, we have to click a lot to achive it, and that’s a waste of time. That’s why I have prepared an action that does it all automatically, including cleaning the background with R4m Clean Backdrop. Below, I will demonstrate how R4m works with and without subject detection.
The background below is not dirty, but it appears to have a non-uniform structure. In such cases, R4m Clean Backdrop is also useful, but it is worth noting that in the older version it accidentally damaged the cheek, back and several other parts of the skin, and even clothing:


In the current version of the Clean Backdrop, it no longer breaks skin on this photo, but some parts of clothing do. Enabling the built-in subject detection in Photoshop CC results in the background being improved without affecting the subject or clothing, even on an older version of neural network.


In the above example, even “Automask” built into Retouch4me would handle it well, but when the stains on the background are large, it’s better not to use it.
Sometimes (but very rarely) after using Clean Backdrop strange, bright spots remain in a few places. I removed this example because it no longer happens in the current version, and in the photo, which previously resulted in very bright discolorations on the floor, is now okay:


And what if the background is like a garbage? Of course, no one would really take a photo with the background that I will demonstrate, because it clearly needs to be cut and replaced with new one, but let’s see. Finally, for some strange reason, I still managed to do the photo shoot myself…

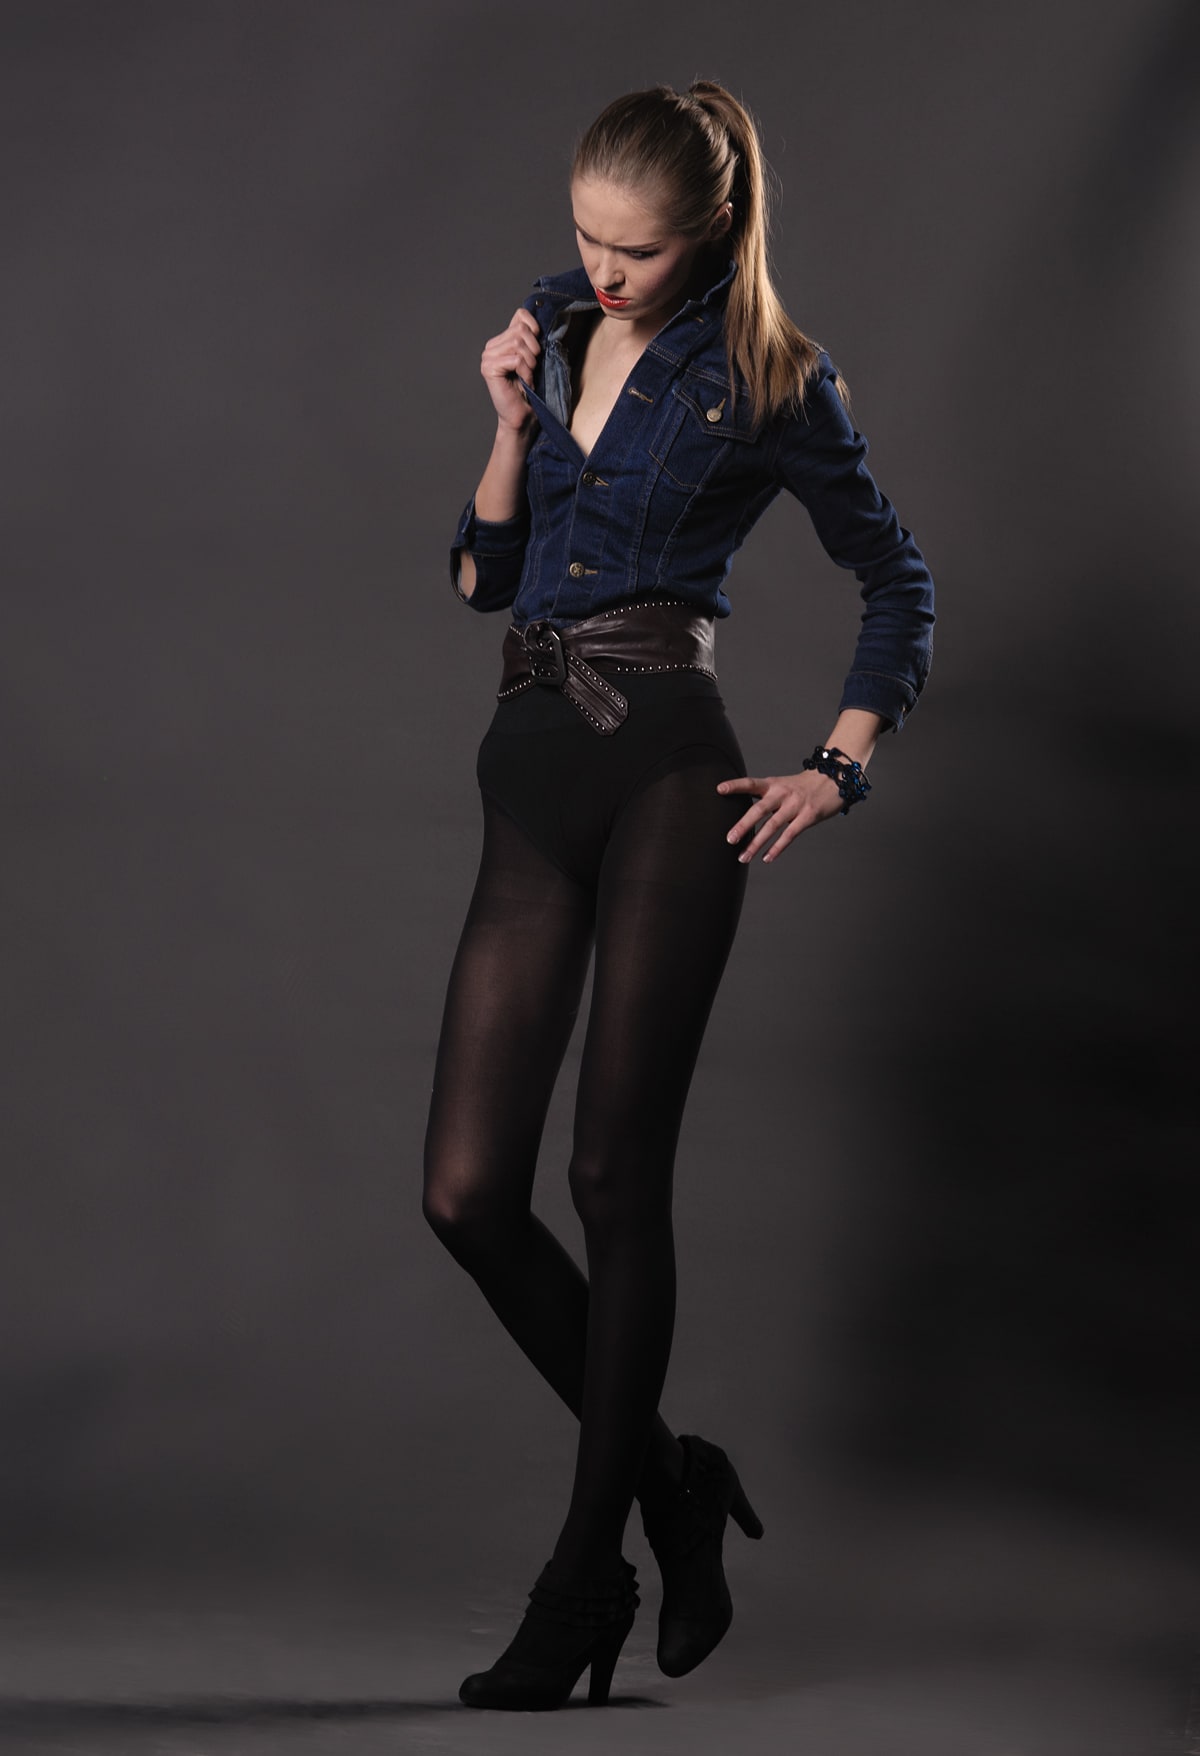
It will need to be manually corrected, but not much and such a result impresses me greatly. A year ago, there was much more dirt left for manual correction. Moreover, the Clean backdrop plugin has a tendency that when you use it twice in a row on a very dirty background, it can clean it better but also increases the chances of accidentally damaging something.
In summary, this is one of those plugins that comes in handy on almost every studio photograph. Sometimes there may still be elements that require manual correction, but usually not if the background was in good condition.
Ironing clothes – Fabric (update: May 2023)
This is a new tool released in 2022 that allows us to save a lot of time, especially on photos with full-bodied characters whose clothing is not perfectly ironed. In 2023, the algorithm started to perform even better, especially with shadows around large wrinkled fabric, so most of the photos below have been updated using the latest version:
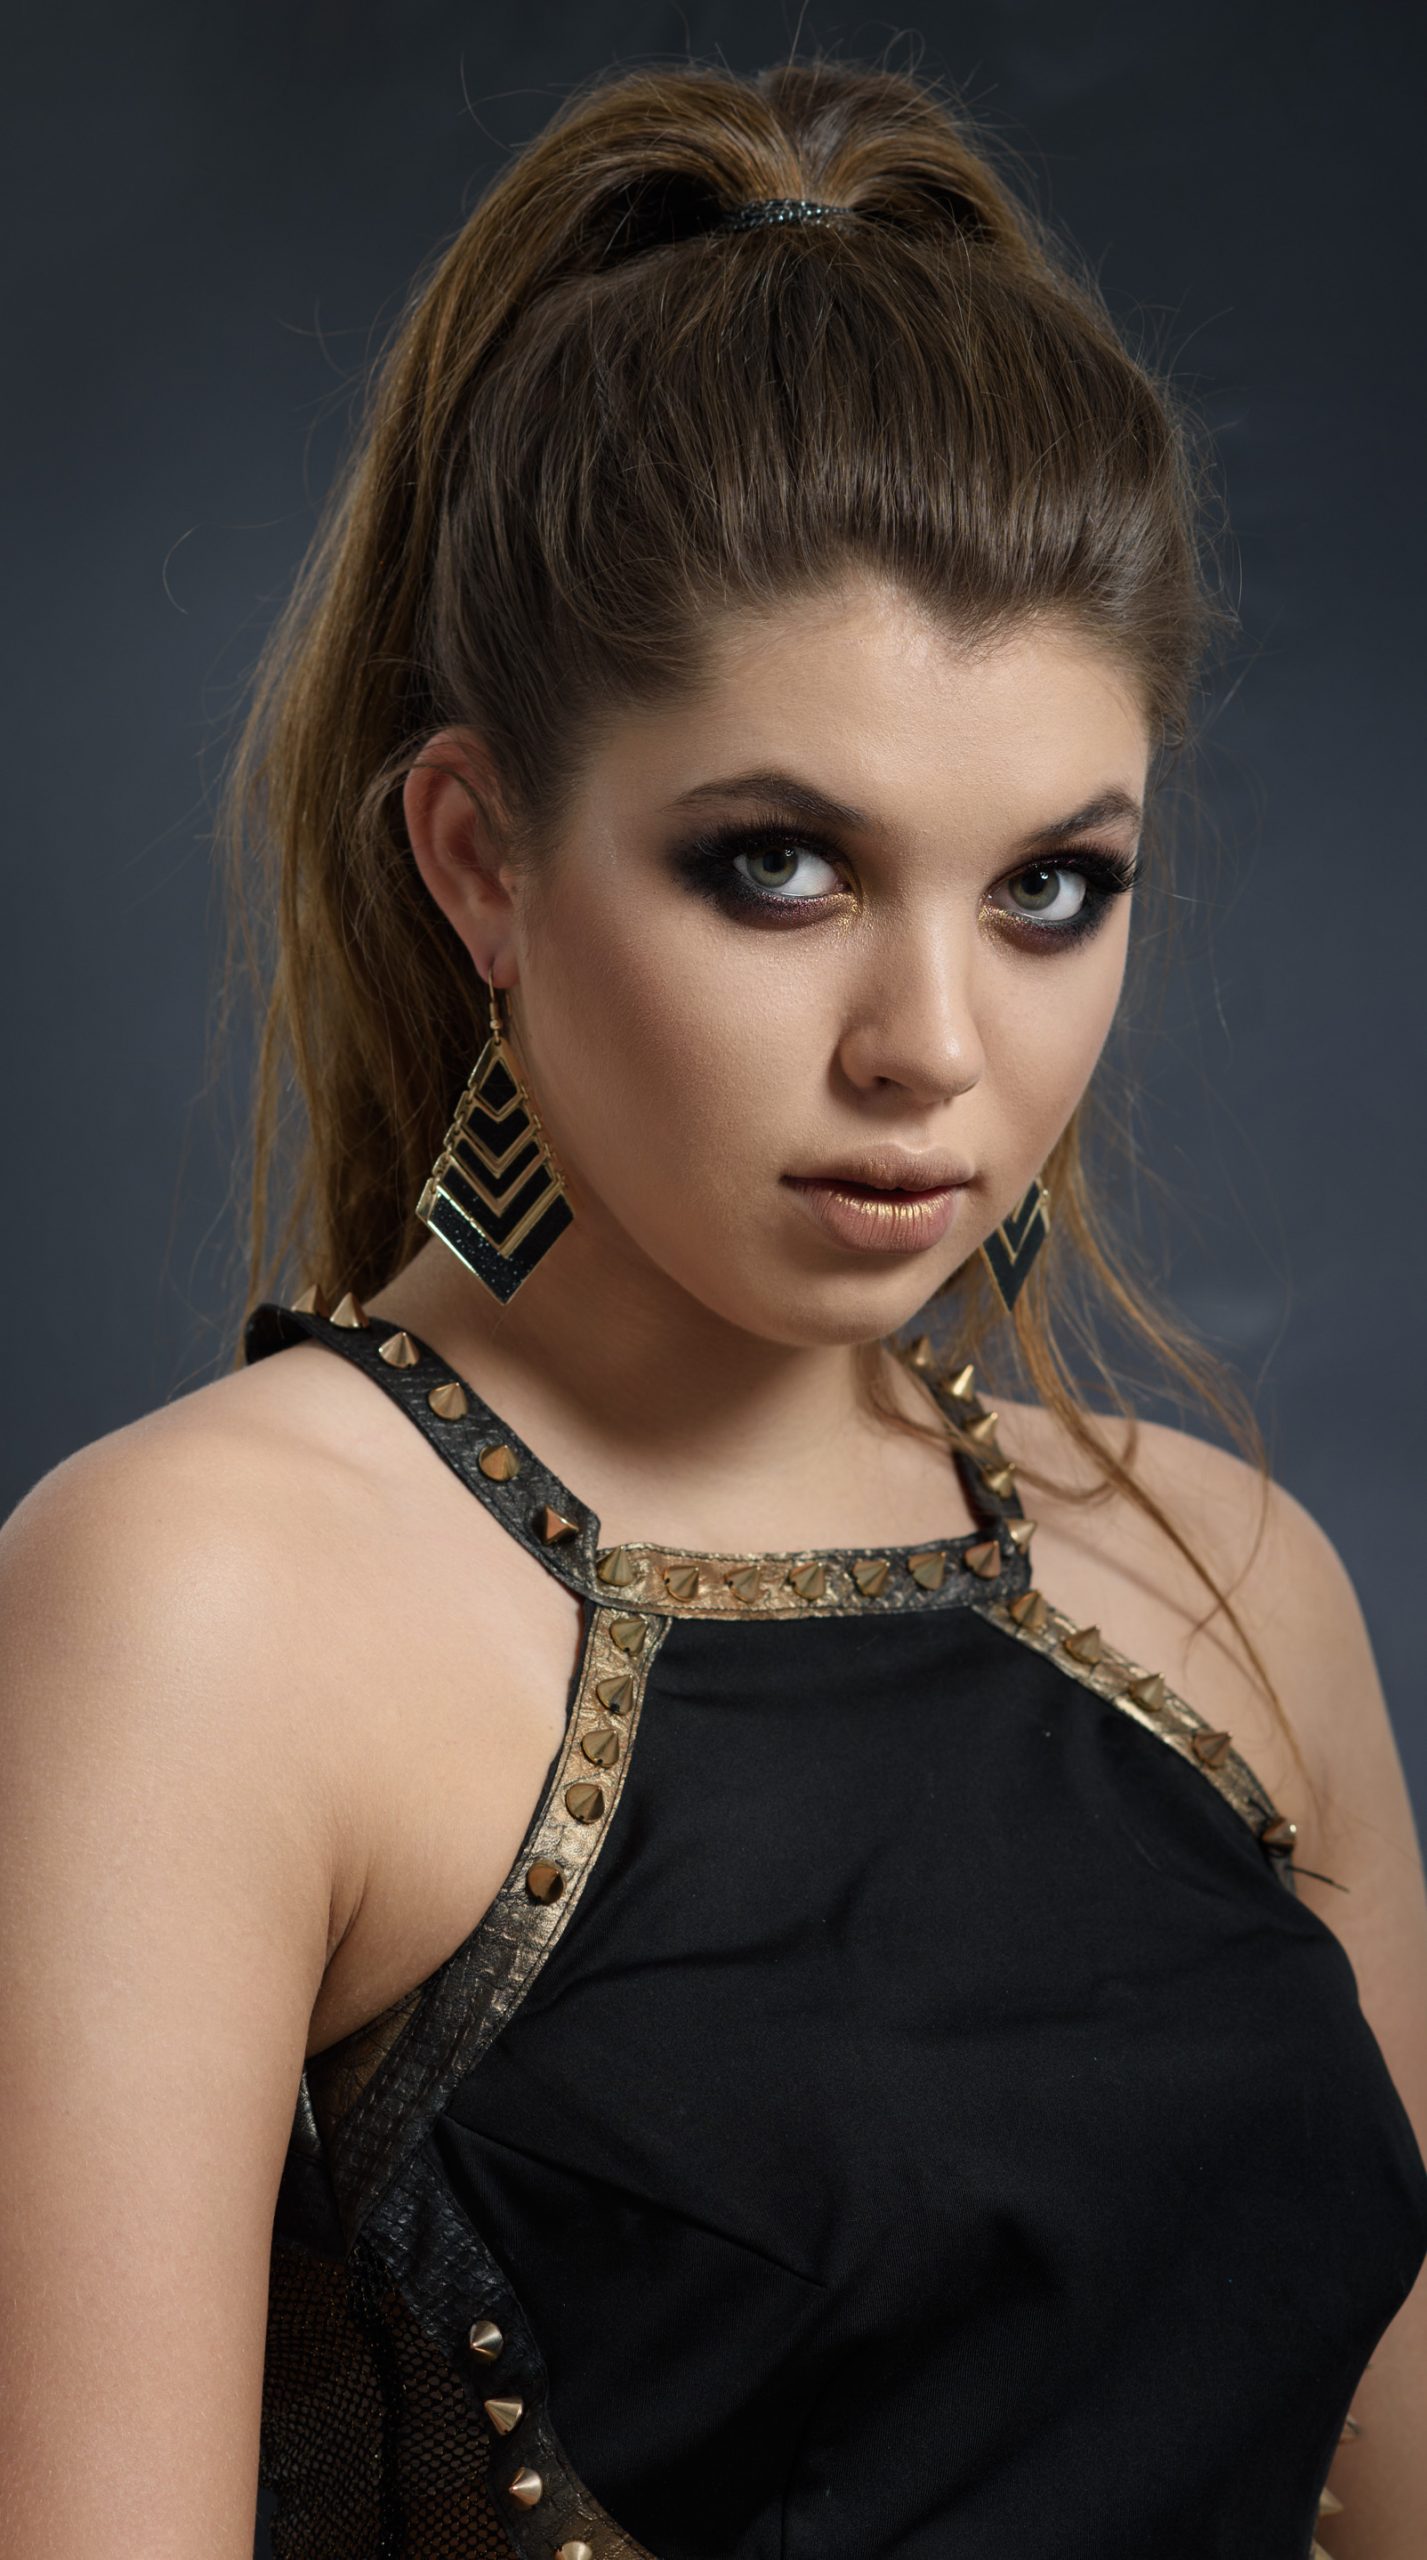


A photo downloaded from Depositphotos
Some folds have unnecessarily brightened shadows, for example on jeans, so I would have to mask them. In the case of this filter, it often happens – it improves many things that we would normally have to clean manually, but at the same time it softens natural folds in clothing.


I think it can also be very useful in business photos, although in extreme cases like the one below, the effect becomes unnatural and some areas would be better off masked.


A photo downloaded from Depositphotos
Sometimes there is also a problem with skin smudging, similar to what happens with background cleaning plug-in. I just came up with a way to bypass automation with the Retouch4me Skin Mask plugin, but not everyone has it.
Skin Mask (major update: May 2023)
This is a tool released in 2022 and it works differently than all other Retouch4me plugins. I do not modify the photo in any way, only select the skin. In this way, you can create a group where all layers, such as contrast, brightness, hue/saturation etc. will only affect the skin. You can also choose whether it should be just the face, the rest of the body, or the entire skin. In the first version, the edges were as sharp as seen below, which was a bit problematic. Now they are smaller and the plug works better, although less accurately at the same time, so it still needs to be improved. The program window allows selecting which part of the skin should be masked:

Returning briefly to the sharpness of the mask, that was how it was in the first version of the plugin:

And this is currently (the plugin launched from Retouch4me control panel):

If you apply a mask using the Skin mask plugin window, you will be able to adjust the area it covers, for example so that the eyes and tattoo would be masked like before. However, regardless of the setting, the mask is not as jagged/hard as it used to be. I think that the mask is usually applied too safely, with too large margins around the skin, so sometimes the settings window is useful.
Selective skin retouching is very common in commercial photos, but if someone buys R4m Heal to have quick editing done, then Skin Mask probably won’t be for them.
When faced with complicated patterns, it can get lost, so since the plug-in tool is generally working okay, I will focus on situations that are very difficult.

Zdjęcie pobrane z Depositphotos
Retouching a heavily tattooed body is rare for me, but I noticed that in such cases it is necessary to use the mask sensitivity option in the plug-in window, to better adjust the edges and finally refine the mask manually. Moreover, the Skin mask sometimes omits a piece of clothing, eyebrows, etc.


Zdjęcie pobrane z Pixabay
Above case is truly hardcore. I didn’t expect that it would be possible to detect the skin between the stitches of a sweater, but someday we will probably reach that level and I will treat this photo as a benchmark.
Other Retouch4me plugins
I have described the filters that are most important to me, and then there are others that I also really like. If I didn’t get a chance to test them, I’d probably end up buying them anyways. Except for Eye Brilliance – I consider it the least refined of all the plugins and don’t plan on using it unless it’s heavily improved (however, Eye Vessels included in the package are very cool). However, there are more plugs…
Portrait Volumes (major update: May 2023)
The most popular plugin I haven’t mentioned yet is Retouch4me Portrait Volumes. It is made to increase the contrast in an “intelligent way” – it contours the photo.


Zdjęcie pobrane z Pixabay
It works best where the light is too flat, where rim light would be great but wasn’t used or it’s too weak etc.


Zdjęcie pobrane z Pixabay
I believe that contouring is a bad idea for professionally made portrait, beauty, and fashion photos, especially if they are taken in studio lighting. Contouring photos with great light usually doesn’t make them look better. Often the opposite is true because the distribution of light and shadows often no longer fits the lighting. I never understood why some people use the dodge & burn method to lighten the edges of their nose, darken their cheekbones, contour their face, etc. In poorly lit photos, one can try to redraw the light, so it may be a solution for amateurs. However, in photographs where the light was well set up, it is easy to break the natural light and shadow. That’s why I’m presenting examples here where Retouch4me Portrait Volumes makes more sense. Everywhere where the light is flat etc.


Although this filter has the word “Portrait” in its name, it is less useful for facial photos than for full body shots. I only use it occasionally. If I were involved in fitness photos where every muscle is contoured, then Portrait Volumes would be used all the time. However, for my photos, changing the contrast with a sharpening filter or gradient map gives better results, especially since this tool sometimes makes mistakes – it brightens shadows in curly hair, causes some spots, etc.


Zdjęcie pobrane z Pixabay
White Teeth (major update: May 2023)
In the current version, the whiteness of teeth is more natural and suitable for the colors in the photo. This is a plug-in that I use the least out of all Retouch4me, because I rarely retouch photos with smiles.
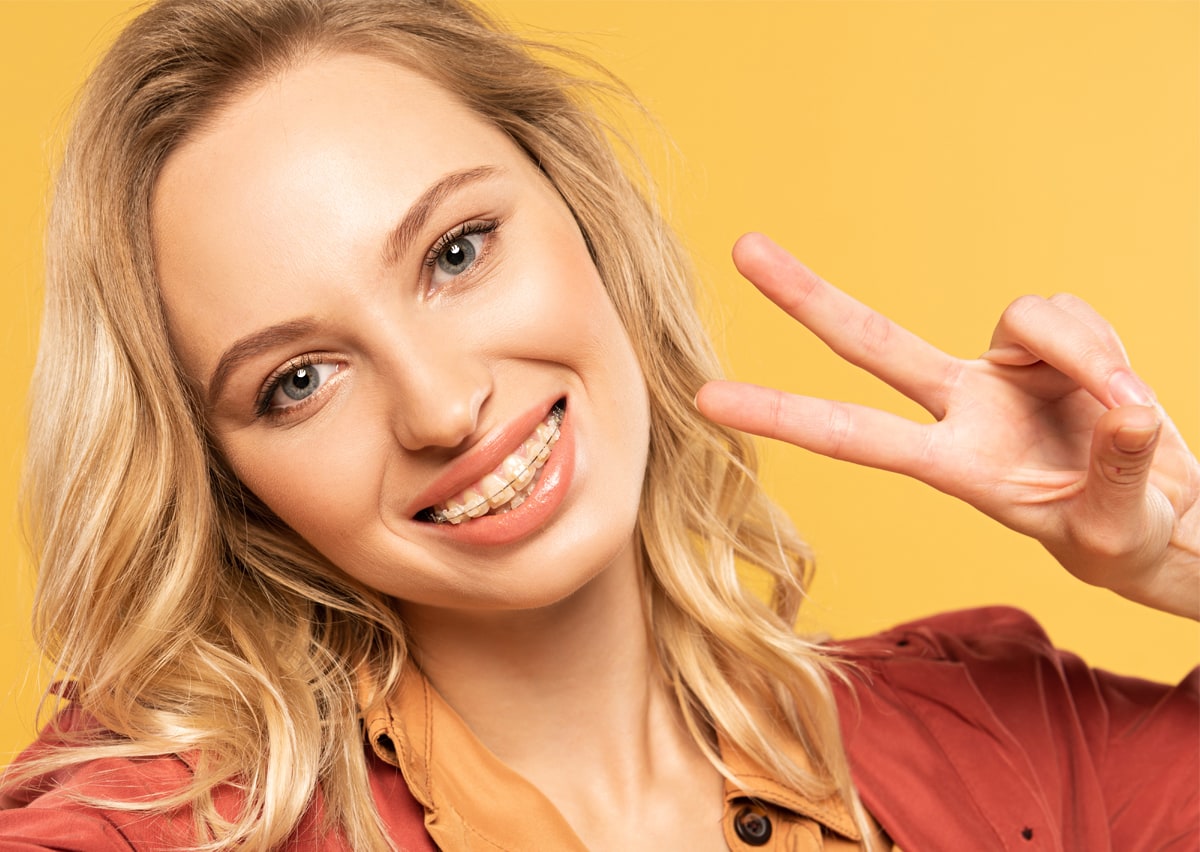

Zdjęcie pobrane z Depositphotos
Below, I used a series of Retouch4me plugins along with White teeth:


Zdjęcie pobrane z Depositphotos
White teeth does exactly what the name suggests: it whitens teeth. It is not trying to clean them from dust, etc.

Zdjęcie pobrane z Depositphotos
Summary
Retouch4me is a really great tool for professionals. It allows us to achieve the same results we would achieve ourselves, but without wasting time on it. Every time I use Heal + Dodge&burn, I am reminded of the times when I edited numerous lookbooks – not only were they always huge amounts of photos, but it mostly consisted of simple skin cleanup with a healing brush and quick dodge & burn. At the same time, the turnaround time for finished photos was very important because until I completed the order, stores couldn’t sell clothes that were worn by models. I edited the skin on every photo manually, and handled the rest (resizing, adding a watermark etc.) in batches. If I were still working on lookbooks today, their editing would be almost entirely automatic. Retouch4me also significantly speed up retouching agency tests and everything else except for beauty.
But what about beginners and hobbyists? For most people, these plugins will be the only way to achieve a very natural-looking skin retouch because without knowledge of the dodge&burn method, it is impossible to have “clean” skin that fully preserves its texture. Besides, knowing the methods themselves is one thing, but you also need to have practice in using them and at the beginning almost everyone goes too far – R4m DodgeBurn doesn’t do that although it can brighten shadows on the nose etc, so it’s worth checking before/after and potentially making adjustments and mask something if it is needed. However, overall – it’s great.
With several other plug-ins, it is not so obvious when you don’t make money from photography. Skin Tone is very cool, it works well on most photos, but on good photos it saves much less time than R4m DodgeBurn. If in the future it will be possible to equalize the brightness of different body parts, not just color, I will praise it to high heaven. Currently, I think it’s a very useful tool that not everyone needs. Similarly with Clean Backdrop and Fabric. For people earning money from photos, it’s a very simple choice – they will buy it because there is no option for not making even more money on it. But for a hobbyist, it is not like that. Recently, the latest Mattifier joined my favorites and it’s similar – a very useful tool for professionals and an interesting item to consider for amateurs. Due to the fact that a huge part of my photos are portrait shots, I also highly value Eye Vessels. However, White Teeth and Eye Brilliance are the least important for me from the entire package.
How to buy Retouch4me cheaper?
The plugins are sold only on the developer’s website. This is my affiliate link which gives a 20% discount: https://t.voland.studio/r4m.
What’s the deal with my Photoshop actions (for now only in Polish)?
Actions automate what is often done during photo editing. Over a decade ago, I created my own PS Actions which became very popular and have been developing them ever since. With the publication of this article, I released a version that includes support for Retouch4me plugins (the ones in purple color). Thanks to these actions, instead of manually creating layers, changing their opacity and applying masks, everything is reduced to a single click.
Some actions trigger the entire set of plugins, e.g. R4m H+DB+ST+V activates Rreouch4me Heal, DodgeBurn, Skin tone, and Portrait Volumes plug-ins. Meanwhile, the R4m Start action prepares a photo using AI and creates additional layers for further post-processing, so it’s worth launching it right after opening a new photograph.
Blue actions are for Nik Collection plug-ins – they launch them, apply masks, select tools and configure them. Together with the Actions, there is a mini-course presenting in videos their operation.

