Mac mini 2018 part 2 - my first impressions with Photoshop, Lightroom, and more

I have already written a huge buyer's guide to the new Mac Mini, where I also included benchmark results and so on. But I still have not described my own experience of using the new Mini or how I put all the parts together. I only posted something to Instagram Stories occasionally. I wanted to wait until all the pieces of the puzzle arrived. I finally have everything here, so it is time to write something...
Note! A "new" Mac Mini came out in 2020, but it is the same model as the 2018 version, only with a slightly different pricing policy. All the information below about the 2018 Mac Mini therefore also applies to Minis bought in 2020. The upgrade prices for some parts are simply lower now, or you get more storage for the same price.
Putting together my Mac Mini
As a reminder, I ordered the i7 version with a 256 GB SSD, 8 GB of RAM, and 1 GbE, intending to upgrade it myself.
Moshi DisplayPort - USB-C First, I needed a new cable to connect the monitor because I did not own one with a USB-C plug. In my case, it was not as simple a purchase as it might seem. The NEC PA322UHD has only one input, DisplayPort, that provides the proper image: 3840 x 2160 px at 60 Hz. The other connectors support a maximum of 30 Hz, and at that refresh rate the computer would be unusable.
I therefore needed a DisplayPort to USB-C cable. The problem is that cheap DisplayPort cables are horrendously troublesome. Whenever someone wrote to me about the nonsense they were dealing with when connecting a monitor through DP, I replied that they had probably bought a cheap cable. Even if it was version 1.4, replacing it with "the same" cable from a reputable brand would solve the problem. I do not think that diagnosis has ever failed. I have encountered this problem many times outside my inbox too, so it seems to be common. I had absolutely no desire to experiment with cheap DP cables myself, but a place right next to my apartment sold them, so I was tempted to run a quick test. I tried a cable worth the equivalent of 60 PLN with a 2018 MBP, but there was no surprise: it did not work. Instead of wasting time looking for something cheap that would eventually cooperate, I returned the cable and ordered one guaranteed to work: Moshi USB-C to DisplayPort 1.5 m
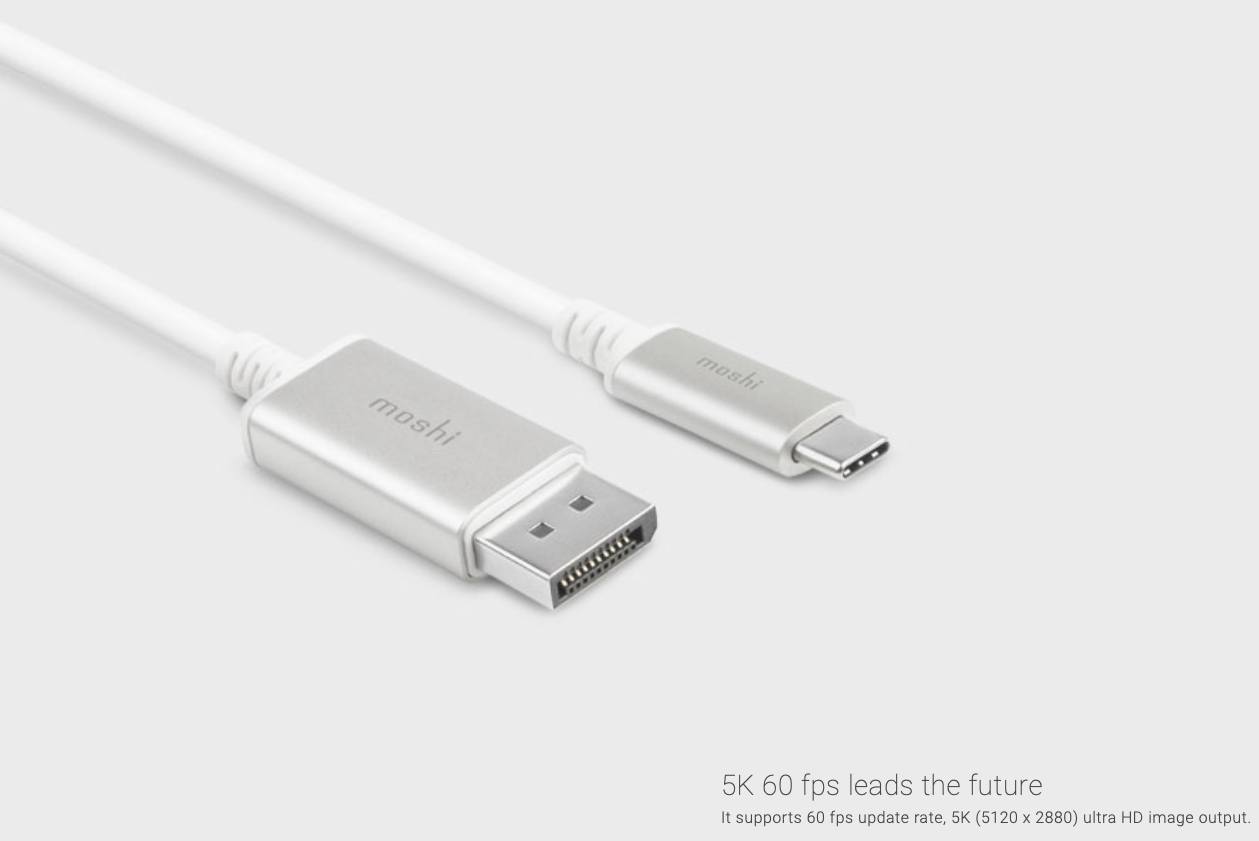
It is a proven cable and even has Apple's blessing, so everything went smoothly with it. Unfortunately, every reliable DP cable costs similar money, meaning more than 200 PLN. This does not mean the image quality is worse on cheaper cables. This is not analog. They are simply unable to transmit a 4K image at 60 Hz at all, despite what their specifications claim, and they often have problems at lower resolutions too.
Crucial SO-DIMM 2666 MHz RAM, 2 x 16 GB Like the cable, I bought the RAM before the computer arrived. Several people before me had tested exactly the same Crucial model in this Mac, and the price was good, so I did not even consider other brands. Installing the RAM was easy, although pushing the motherboard out of the case required quite a lot of force. I felt uncomfortable to say the least, imagining scenes with the heatsink torn off and the motherboard broken into several pieces. But people in the tutorials managed it, so eventually I dared to do the same, and it ended well. Undoing two screws on the motherboard also took some force. From what I have seen, many units, or perhaps all of them, are like this.
Samsung 860 EVO 2 TB SSD In the end, instead of buying the ultra-hyper-fast Samsung 970 Evo (NVMe), I chose the merely very fast Samsung 860 Evo, a standard SSD with speeds of about 500 MB/s.
 Its price had dropped considerably recently, and when the time came to click "buy now", it fell again for Black Friday, so I was very lucky.

Unfortunately, as I write this sentence, it is more expensive again, although still not as expensive as buying it directly from Polish stores. I had also been considering the WD Blue, which is normally slightly cheaper and almost as good, but the promotion removed all doubt. Even with the discount, smaller drives still offered better value, but I really wanted exactly 2 TB.
I do not know what I would need NVMe drive speeds for, but if the price were similar, I would pay extra just in case. Unfortunately, the cost differs considerably. The Samsung 970 EVO is almost twice as expensive. An enclosure that could make use of its speed widens the difference even more, although perhaps not by as much as I initially assumed.
Enclosure for an M.2 SSD I bought the M.2 version of the drive instead of the standard 2.5-inch model so it would be as portable as possible if needed. An M.2 drive is also very easy to hide behind a desk, which is exactly what I did. This enclosure was why I delayed describing my first impressions. It arrived last, and because all my work files were going onto the drive installed in it, I was in no hurry to use the computer without that final piece.
I bought a Wavlink USB-C Gen 2 (the Gen 1 version is more than ten percent slower with this drive). I did not want to experiment with the cheapest no-name enclosures. This model was only slightly more expensive, but at least I could find some tests. It is also made of metal, which I consider a major advantage given SSD temperatures.

The set also included a screwdriver and two cables: one USB-C to USB-C cable supporting USB 3.1 Gen 2 and one USB-A to USB-C cable supporting USB 3.1 Gen 1. I also consider that a plus because otherwise I would have needed to find a 3.1 Gen 2 cable that would not slow the drive down. All USB-C cables look the same, regardless of whether they are 3.1 Gen 2 or 2.0.
The Thunderbolt 3 enclosure I really should buy if I chose an NVMe drive is several times more expensive. Fortunately, Miłosz Bolechowski discovered the i-tec TB3MYSAFEM2, which costs a reasonable 600 PLN instead of well over 1,000 PLN for almost every other model. It is the best offer I have encountered. The problem is that, according to the manufacturer, it does not support drives larger than 1 TB. I will not believe that until someone checks whether it is really true. If it is, we are back to square one, or about 1,300 PLN for a decent Thunderbolt 3 enclosure.
In any case, even that i-tec still costs much more than $26 for good-quality 10 Gbps USB, and when combined with the drive the difference in price becomes huge.
Built-in SSD I chose the 256 GB drive, but because everything except the operating system and applications is on the external drive, the built-in one has so much free space that 128 GB would easily have been enough for now. There would still have been plenty of room for the swap file and for the system to maintain maximum speed and a very long drive life. In reality, I am using 75 GB, plus various bits of rubbish and the Time Machine snapshots macOS creates on the system drive when free space is available.
To the point: first impressions of using the 2018 Mac Mini
Cooling I will begin with the fact that the cooling really is much better than in older Minis. Normally, the computer is completely silent. When I do something in Photoshop, the fan is audible and sometimes speeds up, but it remains very quiet. In fact, the well-behaved 5,400 rpm hard drives in my NAS make more noise. Only when something is rendering, or Lightroom is generating previews, for example, does the Mini speed up further and become clearly audible. Even then, it is still not as loud as previous models at full speed. I have a slight obsession with silence and record audio at the computer, so this is very important to me.
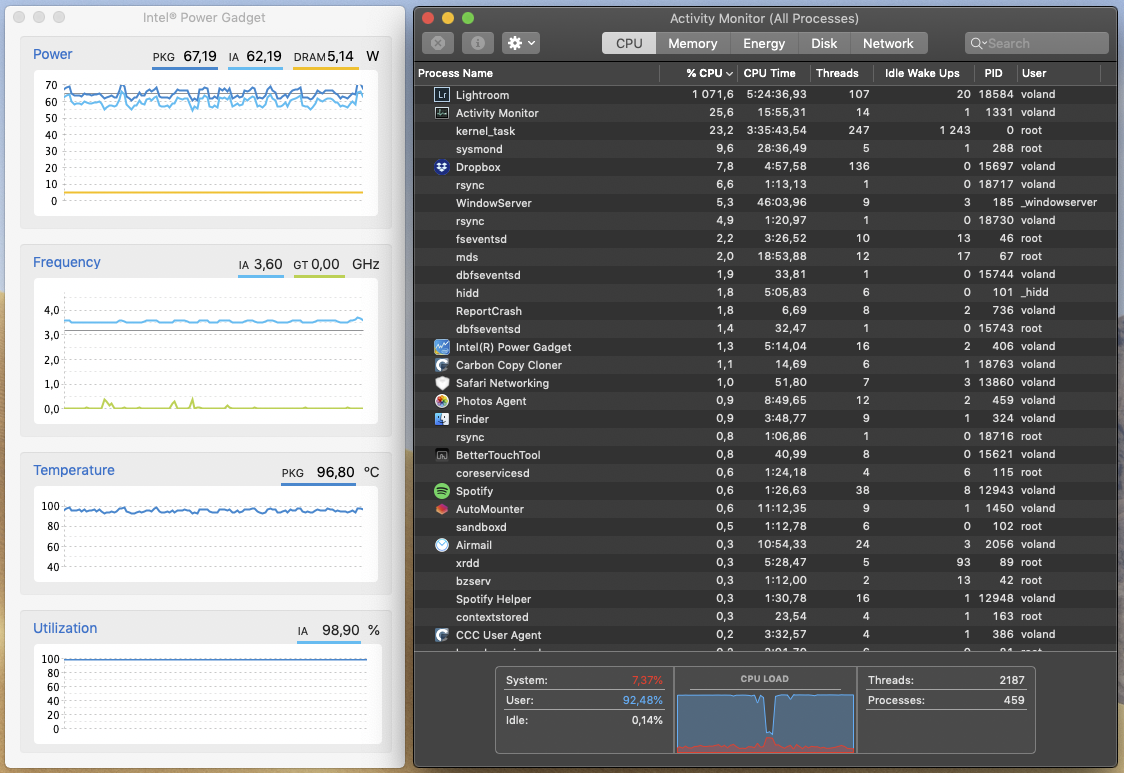
Processor The i7 performs extremely well. When nothing is happening, the system lowers its clock speed, but the moment it has anything to calculate, it jumps as high as 4.6 GHz. Generating 1:1 previews in Lightroom could not heat the computer enough to force the clock down to the native 3.2 GHz. Instead, it remained at 3.5 to 3.6 GHz, even after several hours of continuous load. The Mini performs jobs like these with the processor close to 100 degrees Celsius, which does not bother this model. I should add that I obtained these clock speeds with the air conditioning turned off, so the room was at least 30 degrees.
Integrated graphics Lightroom Classic was clearly ignoring the graphics card and using only the processor. Perhaps if I also enabled noise reduction and some other demanding tasks, the graphics could prove itself more, but I do none of that with my photos. I would have to prepare a special test library for the purpose. If nobody else checks it, I may deal with it in the future.
I still do not know whether I will buy a graphics card connected through Thunderbolt 3 or stick with the integrated one. For rendering the interface, system animations, and so on smoothly, the Intel UHD 630 built into the Mac Mini works better than the ancient GeForce 750M in my previous computer. This is especially apparent after enabling display scaling. I mention that GeForce because the two cards perform very similarly in benchmarks, and the GF is even better in some places. That is probably true in games, but not in the system. Games on a card like that, ha ha ha. I suspect that because the Intel is newer, it simply has much better support for Metal 2, which macOS relies on.
I have the impression that not every interface animation is always smooth at 4K, but I find it very hard to judge with absolute certainty. I am used to spending long hours every day with the ultra-smooth iPad Pro, which displays everything at 120 FPS/120 Hz without the slightest stutter, while my monitor is obviously 60 Hz. After using this Mac longer, I will be able to judge it better because perhaps some animations will start to stutter badly somewhere. For now, I certainly have not encountered any serious slowdowns. It is better than you might expect from a card like this, and it will only improve at standard resolutions.
From an initial test, I also conclude that live streaming and the additional video recording that accompanies it, as during my webinars, use the graphics card heavily. The same applies to the set.a.light 3D software for simulating photo shoots, although it would be strange if the graphics card were not the most important part there. I also use this application during live streams, which makes quite a combination.
So my first impression is that while a graphics card probably contributes little to photo editing alone, it could make a major difference in the other things for which I will use the computer. Apparently, however, Lightroom makes much greater use of dedicated graphics cards than the integrated Intel UHD, so I would need to run a comparison.
Just one more important point about the integrated graphics: I experimented with different Photoshop settings, and my initial observations suggest that Basic drawing works best.

Responsiveness is good with that setting, and you can work comfortably on large files. The other drawing options were worse for me. I tested them with a 36 Mpix PSD containing many layers. But this is not certain, and it would require longer tests on different images. Large PSD files like this also stutter a little when zooming just after being opened, for example, but after a moment everything is cached and runs smoothly. On a decent dedicated card, the advanced option will obviously be better.
In any case, even the integrated card looks very promising for photo editing. I feel that I will buy an eGPU, but probably because of all those non-photographic uses. Then I will also be happy to check what it actually adds in Photoshop and Lightroom. We know what it does in principle, such as calculating some filters, but I mean how it affects the entire workflow. My previous comparisons of this kind gave a fairly clear result: it makes almost no difference in retouching. But I would be happy to run a slightly broader test that is not limited to high-end retouching and also checks batch processing. Not yet, though, because it is hard to find a good eGPU enclosure plus an RX580 with inexpensive shipping to Bangkok. I will certainly keep following the subject and report how it develops.
Memory 32 GB of RAM now seems completely sufficient for Photoshop. I had 16 GB before and suffered badly because of it. Even 24 GB would have made a huge difference for me, and having more is even better. My impression is that Lightroom will take everything you give it, but I have no idea how much that speeds it up. I often hear that Lightroom tends to slow down over time, and after changing computers I created a new library from scratch, so there is no point in making categorical claims about performance in this application now. In its current state, though, the response when changing settings, zooming, selecting a photo, and so on is very good. You click, and the change immediately appears on screen despite the 4K resolution. Screen resolution matters to Lightroom more than logic would suggest, so if it is fine at 4K, it should really fly at normal resolutions. I had been afraid that this was where the integrated graphics would wave the white flag first. But there is no reason to celebrate yet. We will see how it works after more time and with a larger library. Mine was 0.7 TB, consisting of 19,000 RAW files mixed with a small number of PSDs.
This is not the end
That is all for today, but the Mac Mini subject is certainly not finished. I will return to it.
Update: I returned to it in the Q&A below: https://youtu.be/hKuIQrVUoWE