KVM switch – using multiple computers and monitors with the same peripherals and cable management. CKLau KVM
I have a mouse, keyboard, speakers, and various devices such as monitors connected to my PC. However, I also wanted to have a Mac and switch between computers quickly so that most of the devices would also "jump" to the one I am currently using. For several months now, I have been using a KVM switch for this purpose. I press one button, and the second computer appears on the monitors, with the same keyboard, tablet, Stream Deck, etc. For me, there are two computers with two monitors, but someone else might have more of them, such as 2 monitors + 2 TVs + 3 computers + a console, etc.
Why I Need This
I need both a Mac for almost everything and a powerful PC for 3D modeling, VR, and gaming. I used to have a Hackintosh, which allowed me to do everything, but its performance was no longer enough, and I couldn't make it more powerful. So after Hackintosh, I had to use only a PC with Windows, which allowed me to have a top-notch NVIDIA graphics card, but I couldn't run macOS. Eventually, I ended up with the setup I am describing here: a powerful PC + a Mac Mini.
Software for 3D on Mac works poorly, and VR and games are primarily for PCs (recently also PSVR2, but it is a wired solution with a very small game library for now). The current generation of consoles has such a huge graphical gap compared to powerful PCs that combining a Mac with PS5/X-Box Series X would still be too much of a compromise. Therefore, there are now both a Mac and a PC in my home office. Both must be connected to the same monitors and share many peripherals. Only things related to gaming are directly connected to the PC and will never be used on the Mac.
Switch KVM
One might think that a KVM switch is a kind of docking station – a device to which USB hardware, speakers, and other equipment are connected. However, docking stations usually have many other functions – memory card readers, video ports different from those on the computer, etc. A KVM switch allows to use only the video outputs that we already have, and typically has nothing more than a small number of USB and audio ports. We add everything else ourselves. Therefore, a USB hub is often connected to the KVM switch, and many devices are plugged into it. KVM switches are popular in corporate and server solutions, but they also come in handy in home environments. While docking stations are mainly used by laptop owners, KVM switches are also often combined with desktop computers.
A KVM switch (Keyboard Video Monitor) is a general term for a device that serves exactly the purpose I wanted to achieve. KVM switches have video and USB ports, so computers, monitors, mice, keyboards, and other devices are connected to them. Then, the KVM switch allows to switch between computers along with everything connected to the switch. This is done by pressing an appropriate combination of buttons on the keyboard, mouse, or directly on the KVM switch itself, or on a remote control attached to it. I prefer the last option, and I have the remote control hidden under my keyboard (the one with a cable and illuminated number of the currently active computer):
Switching with the keyboard and mouse is done without any software on the computer, because it must work with everything and everywhere, including, for example, in the BIOS as well. There are dedicated USB ports for the keyboard and mouse, "listening" for specific button combinations. Other devices are connected to regular USB ports.
So, near my computers, there is a small, metal cube, into which various video and USB cables go in and out.
The KVM switch shown above looks like it was taken straight out of the 1980s, and that's the norm for these devices, and I guarantee there are even uglier ones. It doesn't matter to me – the switch is hidden under my desk, so I last saw it a few months ago and couldn't even take a picture for the article.
I wasn't sure if switching between two computers would work for me and I wanted to figure it out cheaply. I chose one of the models from CKLau, supporting 2 4K@60Hz monitors (DP and HDMI) and USB 2.0. The cost is $120, but with shipping and taxes, it came out to about half more.
For more advanced models (for more computers or monitors, or even with USB 3.0 instead of 2.0 or for high-refresh-rate screens), the price increases dramatically. That's why a few years ago, when I made calculations that included 3-4 monitors and fast USB, I ended up with huge amounts – at that time, even higher than the cost of a Mac (although the cost of importing to Thailand played a significant role). However, USB 3.0 in KVM is less needed than one might think, and I'll return to this topic shortly.
Device Map
Before making a purchase, I wrote down how I needed to connect the devices to make sure I had enough ports. I did this, as usual, in the form of a mind map (using the MindNode application):
Mass Storage
I didn't think about it before, but the hard drive must be connected directly to the computer because otherwise, switching devices could easily damage the data. After all, the system suddenly loses access to the disk, regardless of whether it is currently writing something or not. For the same reason, it is better to have a separate memory card reader for each computer, although it's harder to corrupt data there, as they are no longer in use after copying.
I mounted the SD/CF card reader under the desk
Because of the hard drive and card reader, I used to be interested in having USB 3.0 in the KVM, but later it turned out that it wouldn't have worked for me if connected through the KVM. However, if you have a need like I did a few years ago – accessing the same data from multiple computers – the options are either a NAS or at least a network drive. Currently, I have many documents in the cloud, which syncs everywhere, but if I needed access to large video files, the cloud wouldn't be enough.
Bluetooth
I don't have any Bluetooth devices that need to be on both computers, except for headphones, but they can be paired with multiple devices and switch between them. macOS automatically detects AirPods, and I also have the AirBuddy app installed (it's in Setapp). On my Stream Deck, I have all audio outputs for instant switching as well.
On Windows, I use the MagicPods app because it allows much more convenient switching to headphones than the built-in system solution and has some useful features:
I've heard that some people use USB Bluetooth dongles instead of the built-in Bluetooth in their computers, but I don't know how that works in such a scenario. Of course, many Bluetooth keyboards and mice have the option to pair with multiple devices and switch between them by pressing a button. However, for me, the charm of KVM is that one click does everything for me. Well, almost everything, because I still switch the keyboard layout...
Windows-Apple Keyboard Layout
If I want everything to work perfectly, including all the keyboard shortcuts I've set up for different operating systems, I have to press a button on my keyboard that switches the layout between Apple and Windows. Maybe with the right software remapping of buttons, I wouldn't have to click anything, but for now, I'm sticking with what I have (in my case, it's not just simple remapping, as I also have various layers on the keyboard with different shortcuts, which are different depending on the system).
Audio
In the KVM, you plug in the audio jacks for speakers and a microphone, and then cables with audio jacks go from the switch to the computers. This split audio setup has a lower maximum volume than usual, but good microphones are typically not plugged into the audio jack, instead using USB connections. Similarly, any decent speakers will also use USB or multiple jacks for different channels. Therefore, while these connectors may be used in typical corporate applications, in most cases, it is better to plug devices into USB, possibly through an external sound card (their prices start below 1 dollar, and I had an unused Audioquest Dragonfly Red lying around, which is currently my sound card).
Alternative Solutions
When I initially thought that the KVM switch would cost more than a Mac, I considered alternative solutions.
Some monitors have a built-in KVM switch, but they are very rare. My monitors happen to have this feature, but I will explain later why I still use a separate device.
Manually switching cables every time was out of the question. Sometimes I switch between computers so often that I would probably end up with issues with the ports or cables, and most likely, I wouldn't be able to use both systems as efficiently as I do now because I would hesitate ten times before deciding whether I really needed to switch.
Using one of the computers through a remote desktop is another possibility. However, I used three monitors with Windows and wanted at least two for the Mac. I couldn't risk color management issues and didn't want additional latency when playing games like Overwatch, etc.
Potential Issues with KVM Switches
KVM switches come with potential issues that I was concerned about. Some switches take a long time to switch between computers, are incompatible with certain hardware configurations, or don't work with specific cables. That's why I wanted to avoid buying something completely unknown and preferred a package that included all the necessary video signal cables (besides, tested DisplayPort cables are expensive, and cheap ones often have problems with 4K@60Hz).
KVM switches require a lot of cabling because, first of all, you need the cables you would typically use, but instead of connecting them to the computer, you plug them into the KVM. Secondly, you need cables going from the KVM to the computers. Since my KVM supports two monitors with two computers, it means I need four cables (as both monitors must be connected to both computers), plus the cables I already had. So instead of two cables, I have six.
Mouse and Keyboard
Almost every KVM switch has two special USB ports for keyboard and mouse, which are different from the other ports. These two ports listen for commands from the keyboard and mouse, and when the appropriate button combination is pressed, the switch moves to the next computer.
My KVM switch has the shortcut assigned to double-clicking the scroll wheel. So instead of using a remote, keyboard, or button on the case, I can double-click the scroll wheel, and it's done. It may seem like an opportunity for frequent, accidental switching, so I didn't even consider using this feature. My mouse is wireless, but it's not a problem, as it's an MX Master 3 from Logitech, and its dongle works with my switch. However, it might not work perfectly with Logitech Options+ software, and in that case, you need to uninstall it. Compatibility with hardware is an individual matter for each KVM switch, and manufacturers sometimes publish compatibility lists.
Keyboard shortcuts make much more sense and can be changed. Depending on the switch, the shortcuts will, of course, vary, but for mine, they are as follows:
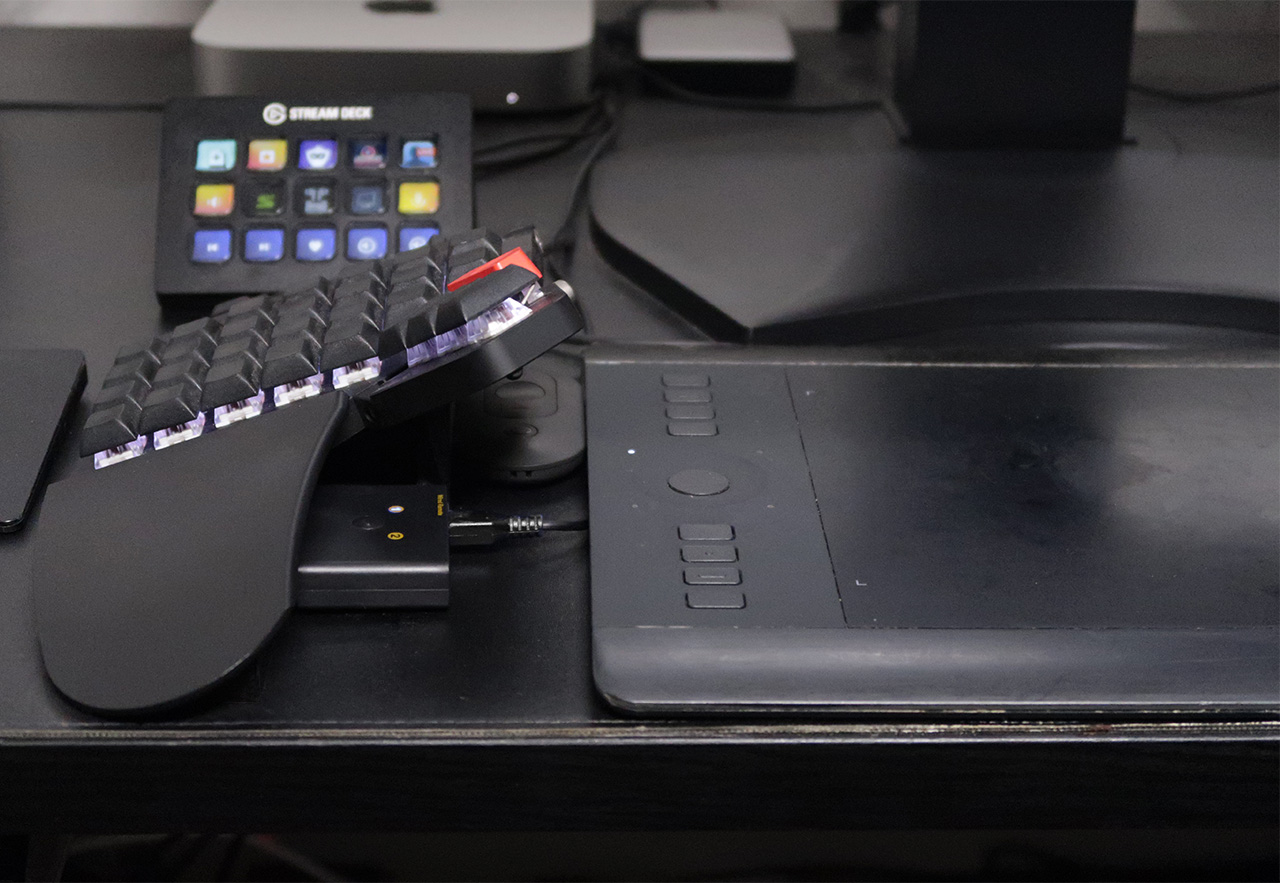
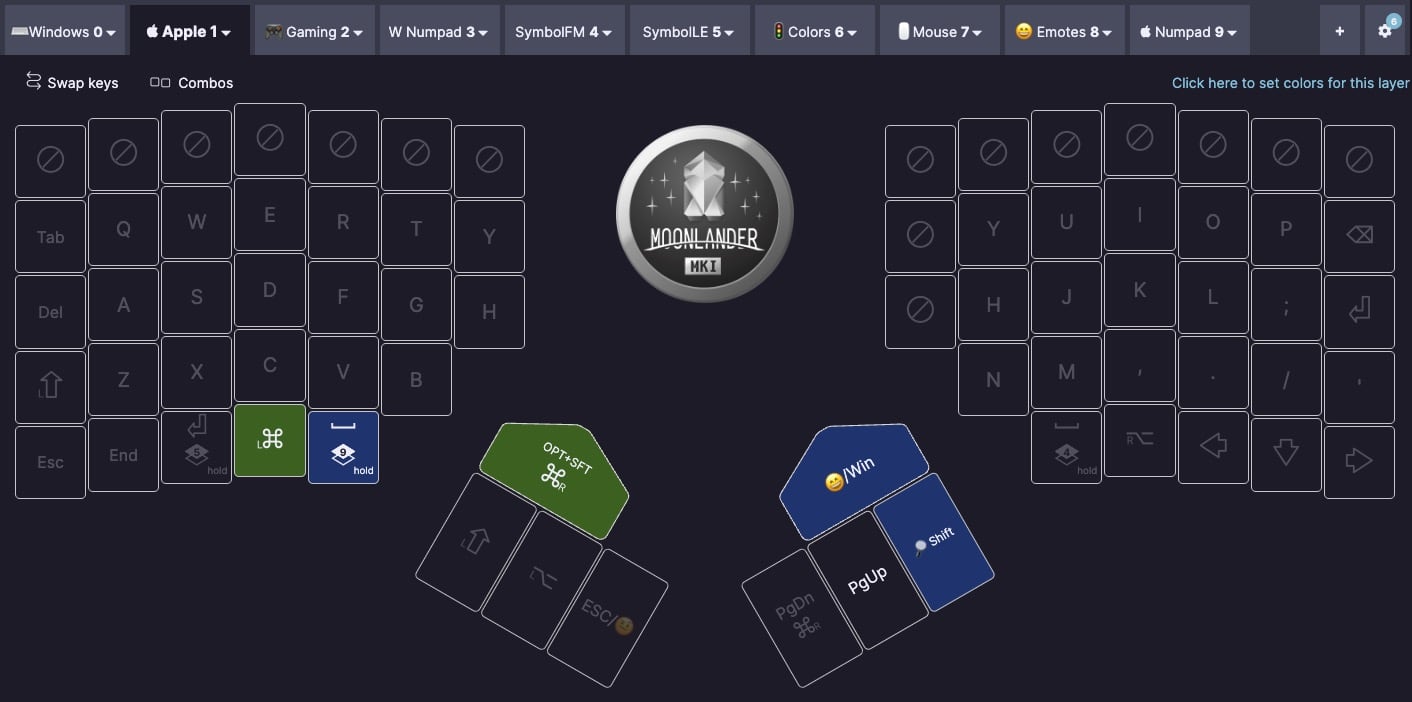
However, while regular keyboards work, better ones might not because they are essentially computers with QMK firmware. My wired ZSA Moonlander is one such keyboard, and to use the dedicated keyboard port, I had to disable this Live training feature:
Most keyboards don't have this option, so it's not a problem, but KVM-related errors can be caused by other settings in this section. I checked all of them, and on the Moonlander, it's just this one option. It caused my switch to change computers every few seconds. In the end, I plugged my keyboard into a regular USB port because using the remote button turned out to be more convenient than pressing a series of keys on the keyboard (but now I'm thinking of programming a macro to do the same with a single keyboard button and then using the dedicated USB port. Unfortunately, it's not possible to program a macro that also changes the keyboard layout simultaneously).
Computer screen
I made sure that the cables from the switch (and USB hubs) were secured, so they wouldn't move when the desk changes height, for example, when I accidentally hit it with my leg, etc. Before I did this, sometimes the monitor screen would flicker, or USB devices would disconnect (the USB cable from the hub to the switch didn't hold firmly enough, causing all connected devices to momentarily disappear).
I also had to take care of grounding, because without it, when I was walking on the treadmill while using the computer (I have an entire article about it here), the image would regularly flicker (and when the washing machine was on at the same time as the treadmill, it flickered constantly – I don't know if it's related, but it made me think about grounding issues). Without the switch, nothing like this happened. Of course, everyone should have proper grounding, with or without a switch, and most likely almost everyone does, but I didn't think about the fact that in Asia, Polish plugs work, but the grounding pin is in the plug, not in the socket like in Poland where I was living before (meaning grounding doesn't work). So, I replaced Polish cables and extension cords with ones suitable for the sockets in my Asian apartment.
Additionally, my body becomes electrified during long treadmill walks, which was problematic for me for reasons unrelated to the switch – I simply shocked everything with static electricity. That's why I now ground myself as well (using a cable inserted under the belt). Thanks to this, I can even operate the ultra-sensitive Stream Deck, which resets itself from the slightest discharge.
Device Notifications
When switching from Mac to PC and back (or vice versa), I don't get notifications about disconnected USB devices (unless, for example, I plugged a USB flash drive/hard drive into a hub connected to the KVM switch instead of directly into the computer) and everything works as before. Switching to the other computer takes about 1.5-3 seconds, meaning the USB switches almost instantly, but my monitors take 2-3 seconds. If the computer was asleep, it takes longer, as it needs to wake up. I've never had to restart the KVM switch, although I did it once when I was repositioning it under the desk. However, restarting it is recommended in case of problems.
Remembering Window Positions on Screens
Better KVM switches support HDMI EDID, which ensures that when the monitor is switched and comes back, the system knows it's the same screen and shouldn't change the window arrangement on the screen. I initially thought DisplayPort didn't support EDID at all, but I would have to read up on how it works with DDM. However, all of this is theoretically less important because macOS and even recently Windows 11 have system-wide monitor and window restoration system, e.g., when connecting a laptop to an additional monitor, etc. This works variably, absolutely not enough for me, but it's better then nothing. While on Windows, I currently only have one program open, at most two, and I don't even know if window layout remembering works there; on Mac, both screens are filled with programs, and I want them to be always arranged the same way, which I never had, even before the KVM switch. I found two programs that can help with this. Both have trial versions, so you can try them out for yourself.
Moom – one of its features is saving window layouts. You can set it to load a layout automatically, for example, when a screen with a specific resolution is connected or activate it at any time with a keyboard shortcut. You can create different layouts, for instance, one for daily work and another when recording a podcast.
Stay – a more specialized tool designed for this single purpose, and interestingly, despite having less functionality, it's twice as expensive and loads layouts slower. It may have some advantage that I don't see, but I chose Moom.
Cable Management
A KVM switch means a lot of cables, plus USB hubs, which needed to be organized:
Usually, I had my cables organized – USB hubs were behind the monitor, and I also used the monitor's ports, but now I needed more of them and wanted to hide the cables under the desk. While I could place the KVM switch in the cable basket tray under the desk, putting the hubs there wasn't a good idea – access to them was too difficult (sometimes I need to replug something) and it was hard to connect anything new. Ports in the KVM switch were limited, so I replaced the small USB hubs with larger ones, as seen in the previous photo (of course, they are active, i.e., with their own power supply, to avoid problems).
This time, instead of mounting the hubs behind the monitor, I mounted them under the desk using 3M heavy-duty tape. This way, they are completely hidden, but at the same time, they are easily accessible since the desk is height-adjustable.
To conveniently connect a USB-C hardware key, I attached a USB extension end coming from the KVM switch near the edge of the desk. It may not be the most elegant solution, but it is very practical. I wanted to use phisical security key, so I really missed this feature before:
In the future, I'll probably design and 3D print a case for it, and if I find that I need more accessible ports, I'll mount one of my older hubs in this way.
10-port USB 2.0 A 30W Hub
Since I have a USB 2.0 in the KVM switch, I also installed such a hub.
My choice was Orico (P10-U2) because it has 10 ports at a low price, with a power supply included, and at the same time it is a brand that I recognize (although for example in disk enclosures they use the same internals as many other companies and do not design and create their own).
Anyway, a long time ago when I was doing research on USB hubs, it turned out that those from Orico have good chips inside, but I didn't check again if this model also does because I don't have any speed requirements for a USB 2.0 hub. I also don't have any power-hungry devices connected to it, so there is plenty of power reserve.
I needed a USB 3 hub for my Mac and briefly considered whether to get one with A or C connectors, but decided on the former because I also have USB-A cables for all of my devices with USB-C and not vice versa. Orico ones were sold out at the time so I got TP Link's UH700 instead.
KVM in (some) monitors
Normally, I would place a Mac next to my PC, connect both computers to the monitors, and that's it. My two displays each have two USB upstream ports (connecting the monitor to the computer) and several downstream ports (for connecting devices). There's even an audio output. Essentially, they have built-in KVM switches, as depending on which computer I'm working on, the USB connection will be established with that device. In the settings, you can configure, for example, HDMI to be USB1 and DisplayPort to be USB2. This way, the mouse, keyboard, pen tablet, and many other devices connected through a USB hub would be plugged into the monitor's ports, so when switching the video output, all devices would automatically switch to the computer I'm currently using. Half a year ago, I thought every decent monitor had two upstream USB ports, but it turns out that it's quite rare. That's why most people reading this article won't be able to use the KVM switch in their monitor because it simply won't be there.
Unfortunately, I couldn't use this feature either, as my monitor has only one video input supporting 4K@60Hz. I bought it when UHD was a novelty, and more 4K@60Hz ports were added only in the next revision. All other inputs on my monitor support a mere 30Hz, where animations and cursor movement are so choppy that using the computer is impossible. The fact that we consider 60 Hz as a semblance of smoothness is a miracle in itself.
Theoretically, I could replace my monitor with a newer one of the same class, with multiple 60Hz inputs, but a 4K 32" display of this level is quite expensive – currently well over 6000 USD, as the days of top graphic monitors costing just 60% of that price are long gone. Besides, I'd have to switch both monitors separately (although this could be partially bypassed when the computer is put to sleep). Fortunately, standalone KVM switches exist.
Summary
I've been using both computers since September 2022, and for me, it has proven to be the solution to all my problems. Now I use both computers alternately, sometimes leaving heavy tasks on one and using the other in the meantime, but most often the second machine is in sleep mode. Thanks to the new USB hubs and placing them so that the cables are relatively stationary, my USB devices are more stable than ever, for example, the camera image doesn't flicker when changing the height of the desk. Eventually, I will add an HDD to the Mac, but overall, I'm happier with my current setup than ever before. Of course, I'd prefer if everything could be done on a Mac and then a fully-loaded Mac Studio would replace my PC, but I've stopped hoping that will ever happen.


 I mounted the SD/CF card reader under the desk

 I've heard that some people use USB Bluetooth dongles instead of the built-in Bluetooth in their computers, but I don't know how that works in such a scenario. Of course, many Bluetooth keyboards and mice have the option to pair with multiple devices and switch between them by pressing a button. However, for me, the charm of KVM is that one click does everything for me. Well, almost everything, because I still switch the keyboard layout...


 My choice was Orico (P10-U2) because it has 10 ports at a low price, with a power supply included, and at the same time it is a brand that I recognize (although for example in disk enclosures they use the same internals as many other companies and do not design and create their own).
 Mass Storage

 Audio
Audio
