

Mac or PC – which computer is better for photo editing and why? Edition 2024
Over the years, a huge number of computer configurations have gone through this article. I suggested Macs due to their easy color management in macOS and great screens in MacBooks. well-functioning scaling, even if it is different on multiple monitors etc.. However, I also showed many alternatives with Windows. I use both systems and I am well aware of their advantages and disadvantages, and during the podcast that I co-host, we discuss all the computer news. Today, aiming for ultra speed in Retouch4me plugins, a PC is a better choice due to software optimization, but Windows also has many drawbacks that are quite significant in photographic applications. That’s why on the first page of this guide, I focus on showing the differences between systems that many people are not aware of, on the second page I describe recommended MacBooks and desktop Macs, and on the third one, which will appear a little later, there will be PCs with Windows.
I have inserted affiliate links into the article, so you can quickly check the current cost of the equipment described.
Table of contents
Newsletter
I try to update my articles and also publish at least a few new posts annually. Sign up for the newsletter, so you don’t miss them!
“Performance” has a different meaning today than before 2021.
When Apple switched to its own SoCs, it redefined what performance means. It was no longer just about the speed of doing tasks, but also about responsiveness and how the computer behaves when, for example, generating 10,000 thumbnails in Lightroom while the user is using it for other things at the same time (not just low demand tasks but perhaps simultaneously editing a 12K video with color grading and lots of filters). Moreover, this does not only apply to high end configurations. Everything switches as fast, as if the computer in the background is not doing anything, while a PC designed for really heavy tasks behaves noticeably differently when under load. However, probably not many people need such high multitasking capabilities, and among Windows desktop computers it is possible to select sensible components for photo editing. The advantage of a PC is that it is better suited for gaming, creating 3D graphics and has various specialized software programs that are missing on Macs. With regular software it is the opposite, but I will come back to this topic later.
Laptops running Windows are a more difficult topic, as currently even the most extreme configurations of MacBook do not decrease performance when unplugged, while those with Windows, due to the power consumption of graphics cards, cannot handle power on battery and must operate at reduced capacity. However, for many applications even this partial power is already quite significant, and there are programs optimized for Nvidia. Unfortunately, Retouch4me is one of those applications but I was promised that they would try to fix it. High power consumption of RTX cards also means much more heat, which results in throttling after prolonged use. A longer load is often actually a moment in reality. In MacBooks, this occurs in the Air model due to the lack of fans. However, the biggest advantage of MacBooks over Windows laptops are their phenomenal screens, especially in the MacBook Pro. Until the previous generation of Retina Screens, I was able to recommend Dells and Surfaces as alternatives, but today there is a huge gap between them.
Laptop vs. desktop computer
If funds are limited, the basic principle says: do not buy a laptop! In the world of Windows, a desktop computer is lower cost and has much better performance. Especially in graphics cards – since the release of the RTX 3xxx and 4xxxx series, mobile versions can be so much slower than their desktop counterparts that users have started discussing whether labeling them with the same numbering is fair at all.
In the world of Apple, for several years now, laptops have been able to run at full power even on battery. However, a Mac Studio has cooling which cannot fit in any laptop and as a result it can be faster than them under heavy load.
Are Macs with Apple Silicon (SoC M) requiring less RAM than Intel Macs or PC?
There is a belief that new Macs require less RAM to do the same thing as before. And if someone needed 64 GB on Intel before, now 16 GB is enough for them. However, in reality, a Mac with an M3 processor and one with an Intel processor require the same amount of RAM (or even more if compared to configurations that had a dedicated graphics card).
However, when RAM runs out, it was strongly felt on Intel machines while it can go unnoticed on M1. This results from the fast disks and high bandwidth between the processor, RAM, and graphics card memory. The higher the SoC model, the greater the throughput (the M1 Pro already has a very good one, and it’s even better on the Max). So the user can actually feel like the computer needs less RAM if they don’t notice any decrease in performance. This does not apply to computers with 8 GB of RAM, as that is barely enough for just the operating system and SWAP has a lot of work to do, causing performance drops that cannot be avoided. Additionally, some of the lowest M2 Mac configurations have much slower SSDs, but in the M3 they returned to the situation that was in the M1, meaning even the cheapest drives have two memory chips which makes them not much slower than larger ones.
What is SWAP and how does it work?
Some people believe that SWAP is the use of disk instead of RAM when it runs out. However, the processor cannot use disk data as if it were RAM because it is too slow.
In simplified terms, SWAP works by copying a portion of data from RAM to the SSD/HDD. Then, the data necessary for processing by the RAM must be copied back into it in place of the location that was just freed up. When the computer performs an operation on this data and it becomes unnecessary, it is copied back to the disk, while what is needed and was previously in RAM is moved back into it. So, a lot of copying data, and the faster BUS and SSD speed, the more efficiently it can be done.
Meanwhile, 16 GB is enough for almost every “average” Mac user. Unfortunately, photographers cannot be included in this category because working with photos is exceptionally memory-consuming. On Mac I consider 16 GB to be an absolute minimum, 24 GB to be the optimal size, and 32 GB already provides full comfort and no need to worry about memory, so I recommend aiming for that size. When upgrading to a 64 GB difference in performance, there won’t even be a noticeable improvement in photos with over 100 Mpix. Therefore, it’s better to invest more in other components or get a better backup solution instead. Expanding RAM to 64 GB should be left until the end when there is no more budget for other expenses. However, for sure there will always be someone who can feel the decrease in speed between 64 and 32 GB of RAM, for example a person creating panoramic photos which will then be processed or running dozens of heavy files in Photoshop at the same time. In general, batch operations are performed sequentially or have at most a few open photos, rather than dozens. And even if there are a lot of them, much more efficient SWAP than on Intel systems is doing a great job here.
But let’s go back to the minimum RAM that we should take. 16 GB is a bit low, because when Lightroom and Photoshop are open, the system has to put even the data that is regularly needed into SWAP. That’s why 16 GB of RAM on M1 makes a difference for me whether I have LR running in the background or not when working in PS on a heavy file. After turning off LR the changes in preview, file updates are not automatically updated, so it’s not very convenient. 24 GB would provide greater comfort here, and with 32 GB, there is no need to even think about something like RAM.
In the past, working in Lightroom with a large library, I would clearly feel the difference between 32 GB and more. On Apple Silicon in the minimum Pro version, the speed of operation would be almost the same, regardless of how many gigabytes I added to those 32. That’s why I wouldn’t bother with having a bigger memory at all. The data transfer speed between components on a Mac is enormous, and they are all shared to create an incredibly responsive system, even under heavy load that would seriously slow down a Windows PC. That is why I would confidently choose Maca Studio with 32 GB of RAM, and its increase would be at the bottom of my priorities list. However, I currently have a PC with such memory and I know that even if I had 128 GB of RAM, under full load, I would not come close to the responsiveness of this Mac Studio with 32 GB. While having fun with 3D modeling, no matter what Mac Studio I had, I would have no chance of achieving the performance in 3Ds Max compared to a good PC. That’s why for years I have both systems for different uses.
In the macOS “Activity Monitor”, you can check how much RAM is being used. Below is an example of a computer with 8 GB of RAM, without any heavy applications in use:

If the system is using SWAP, everything is fine as long as the graph below is all green. Orange color means there is too little RAM available at the moment, but if it doesn’t happen constantly and your computer runs smoothly, then it’s okay. Red color indicates that there is obviously not enough memory and most likely switching to a computer with more memory would give us a noticeable increase in performance.
Moreover, SWAP uses an SSD by saving data on it. However, having a minimum of 16 GB, I wouldn’t worry about it at all. I haven’t heard of anyone who would kill SSD in computers from recent years.
Why does editing photos require faster computers than it used to?
Changes in the last 2 years
A.I. has entered the photo editing scene for good AI-powered noise reduction yields results that would have seemed impossible even 30 years ago, plugins Retouch4me do a lot of photo editing for us and my readers in the survey indicated that they definitely plan to use or already use these tools. This is a significant time savings, as some retouching can be almost entirely automated, and even if not, greatly reduced. All of this is based on a graphics card that used to not be worth worrying about.
What has changed between 2010 and 2020?
Years ago, most of us were editing photos that were 12-16 Mpix, some at 24. Today we have significantly more pixels. Huge changes also affected photography monitors – decent, wide-gamut screens can now be much cheaper than they used to be, so they are more popular among photographers. As a result, editing in 16 bits/channel has become much more common, and it puts a much greater strain on the computer than retouching files in 8 bits/channel. Moreover, in the past no one had UHD/4K monitors which are more demanding (especially when image scaling is turned on). What’s worse, some older graphics cards are no longer supported by Adobe software and now work without acceleration, which has a huge impact on the comfort of work that practically ceases to exist, and working with photos becomes a torture.
Apple between 2010 and 2020
After 2010, Apple computers became even more popular in the photography industry than before due to the incredibly great screens mounted in Macbook Pro with Retina and the exceptionally affordable Mac Mini. In 2011, a very cool computer was made out of it, which in its factory configuration was terrible, but after self-expansion, it was perfectly suited for photo editing. It had sufficient power to retouch photos from the then-full frames and amazing mobility – it was smaller and lighter than laptops produced at that time. Taking a desktop computer from home to the studio for photoshoots finally made sense. In 2014, a very poor version of the Mac Mini was released and it wasn’t until 2018 that another excellent model was introduced. Laptops have been constantly and rapidly evolving, but since 2016 I considered their prices to be significantly inflated, plus the keyboards were causing problems and the performance was decreasing under very heavy load and with an additional monitor. Despite that, it was an excellent piece of equipment, even better than previous generations, just not perfect and expensive. The end of 2019 brought us a significant change in laptops (Macbook Pro 16″), which for the first time in a long time allowed me to praise Apple without mentioning their bad decisions in computer design. Later on, it only got better because the M1 chip and many other good changes appeared, computers no longer fought for every millimeter of thickness at the cost of their usefulness.
Example of AI capabilities
I also have a detailed article on my blog analyzing Retouch4me Photoshop plugins – there are dozens of examples in it, and below I am additionally showing one picture from the above video, but with several additional plugins (Retouch4me Heal and DodgeBurn for cleaning the skin, Skin Tone for color correction, Eye Vessels for removing veins in the eyes, Portrait Volumes for contouring and White Teeth for teeth whitening). Not everything is perfect, for example, I would like to keep the freckles and have slightly different lips, but it’s a much better starting point for manual retouching than the original photo. Moreover, most often these things also look fine.


My role was limited to clicking one button, but then the computer had to process everything and on computers from many years ago it would take several minutes, on those from a few years ago several seconds, and on decent hardware I could process several photos in a minute.
Apple vs. Windows in everything except photography
When I switched from PC to Mac over a decade ago, I was worried about the lack of certain applications. However, I quickly found equivalent programs to the ones I used and they were also nicer with a consistent and more thought-out interface – almost every program had preferences in the same place, etc. Unfortunately, Windows still is much worse in this regard.
What’s more – when I had to start using a PC again after years, it turned out that many great Mac applications don’t have their counterparts on Windows or they are so much worse that you can’t even compare them. On PC there is still no text processor like Ulysses, a search and productivity tool like Alfred or Raycast, a convenient markdown editor like iA Writer, screen recording tools like ScreenFlow, screenshot tools like CleanShot, live streaming software like Ecamm Live, backup solutions such as Carbon Copy Cloner, audio processing applications such as Audio Hijack or peripheral management software such as Better Touch Tool…I could go on and on listing them. The quality of many programs on Mac and Windows is completely different, and as a person who has to use both systems, I feel it very strongly. Moreover, together with a Mac, you get many programs that I really miss in Windows – such as FaceTime, iMessage, etc.; And in addition to that, there are system features like smart folders and authentication with a watch or fingerprint. The possibility of automating EVERYTHING (what people do in Automator, would be science-fiction for a Windows user, which unfortunately cannot be realized in any way on this system) etc.I wrote an article about how I use Windows ,adding some missing functions to it, but it’s only a faint reflection of what is available on macOS.
There is also no Windows service similar to Setapp, where in a small subscription you have access to hundreds of great commercial applications. If I wanted to have as many good programs on Microsoft system as I use in Setapp, I would spend more on them than on the computer itself. The way macOS has surpassed Windows in terms of software is absolutely incredible.
However, the situation changes when it comes to gaming, using virtual reality or specialized software such as engineering. Then Windows remains the only option. For VR, gaming and 3D modeling, I need a PC (which runs Unreal Engine and Autodesk Maya/Blender etc. better on RTX graphics cards).

MAC vs. PC | macOS vs. Windows in photography
If you already know how color management works in Windows or have decided to switch to a Mac, you can go straight to the section “What computer parameters should I pay attention to?” Otherwise, be sure to read the following chapter as well.
When choosing a Windows computer, one should do so knowingly, especially when working on multiple monitors which can be difficult (especially if they are wide gamut). The majority of people think that after calibration everything will work properly, but it's not true. In the Microsoft system, there is no fully functional color management system. There is also no native image scaling in all programs – it depends on the application. Moreover, if you have multiple screens with different scaling set on them, the elements are rendered differently, even in applications that should work perfectly.

Color management
Screens in laptops often do not even display the full sRGB color space, similar to office monitors. So they cannot display the same saturated colors that can be seen in prints (Adobe RGB) or in cinema (DCI-P3). At that time, color management systems were not very important because if the monitor itself “cuts out” intensely saturated colors, it is not noticeable whether the system is when should be doing this. In this way, an average user will not notice that something is wrong. And rightly so – there’s no point in bothering about it.
However, monitors designed for graphics and photography have a significantly wider color gamut than regular screens – they display almost the entire Adobe RGB. And that’s great, because in landscape, macro, nature photography etc., it can make a huge difference. In my area and generally in warm countries, even a spontaneous photo taken quickly with a cell phone can lose a lot after narrowing the gamut to sRGB.
For a screen that can display a wider range than sRGB, the operating system must ensure that interface elements do not have oversaturated colors (program windows, icons, toolbars, or even desktop wallpaper). It would also be good for all non-profiled graphics and photos to be displayed as sRGB. Meanwhile, graphics and photos with assigned color profiles must be displayed accordingly. Unfortunately, it is almost standard in Windows that this does not happen (it is usually OK in internet browser, but not in other system components). Fortunately, the problem of viewing pictures with incorrect colors can be easily circumvented by using color management applications for viewing photos (such as ACDSee). In Photoshop, Capture One and Lightroom, the colors will be correct and this is the most important thing. However, one must come to terms with the vibrant interface or limit the monitor’s color gamut.


If the squares above have a uniform color (instead of being divided into rectangles of two shades), then your monitor’s gamut does not exceed sRGB – it is equal to or narrower. This is limitation if you are preparing things for printing, but it’s enough for the internet. The plus is that in other applications than this browser, you also won’t have any problems with oversaturated colors displaying.
Perhaps only some squares will be divided into two shades (then the gamut is not too wide, but larger than sRGB – then you may have problems in other programs). In pro graphic monitors, the differences are enormous in every square except for the last one. If you had color management turned off, all correct sRGB colors (the ones at the bottom of the squares) in the the photos would be replaced by shades located at the top. So, on wide gamut monitors, eyes would be burned with radioactive colors.
Managing color on multiple monitors
Unfortunately, apart from what I have already mentioned, Windows cannot change the monitor profile on-the-fly that is taken into account by the program. So, by dragging an application with an open image onto another monitor, the colors will not be displayed according to the color profile of the screen. If both monitors are similar (especially if they are not wide gamut), you may not notice that something is broken and assume that both monitors simply display the image slightly differently (which will be true, but not the only reason for such a situation). Only after restarting the program is there a chance for correct color rendering. This often misleads users, because the standard is that someone tries to compare the image on both monitors by moving a picture from one screen to another and immediately observing changes in the displayed image. Probably all of us have done that at some point. All of this results in a big complication, because what if I want to have one program on both monitors at the same time?
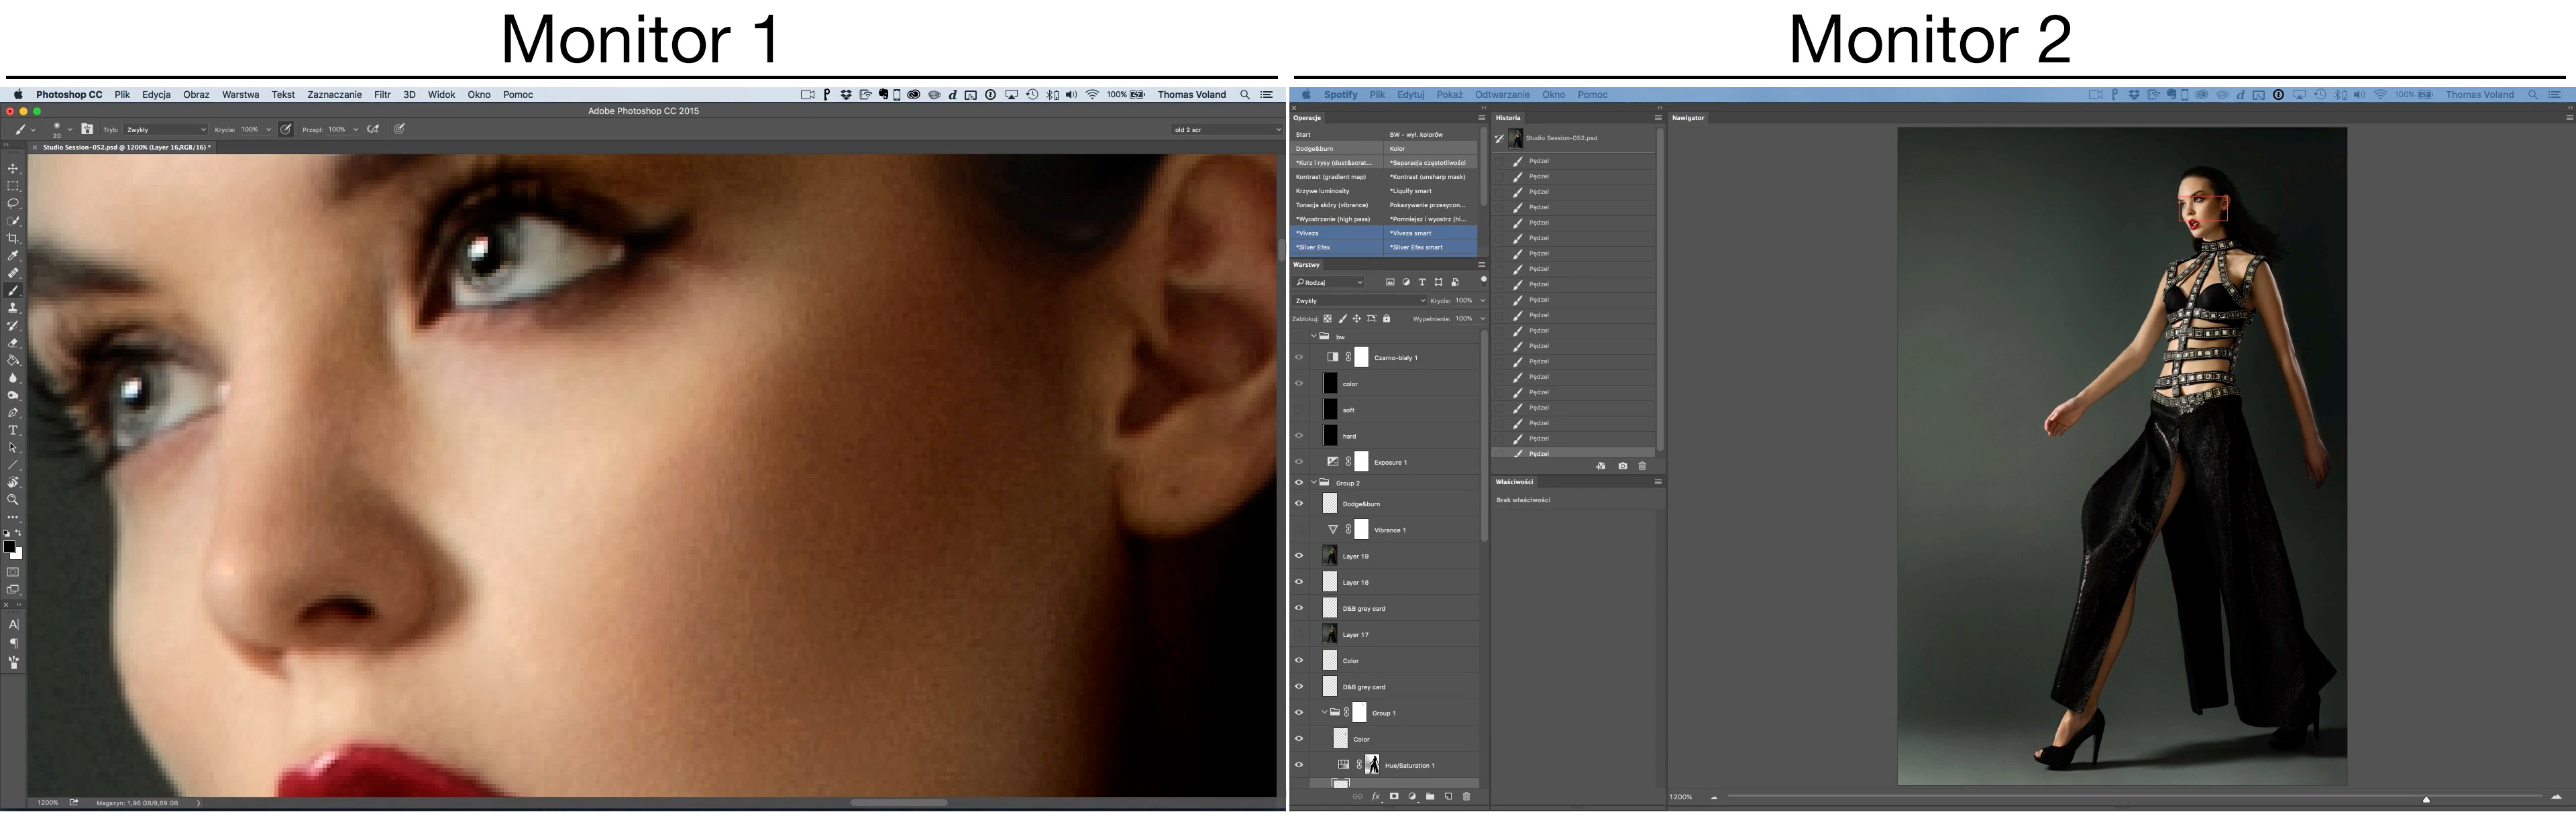
With this Windows configuration, the correct color display will be shown on only one screen. macOS is completely different in this regard – you can skip between screens and display windows of one application on multiple monitors at once, and the colors will be correct. There are many sitations when this comes in handy, for example displaying thumbnails in Lightroom and the full photo on separate screens.
Let’s assume that the colors of the second screen is not important to us because there are only interface elements there like layers etc. Due to the aforementioned issues in Windows, it’s better to make sure whether Photoshop recognized the display showing the image as the main screen, and not the monitor with solely interfacece elements. Otherwise, despite theoretically calibrated monitors, the color rendering will be incorrect.
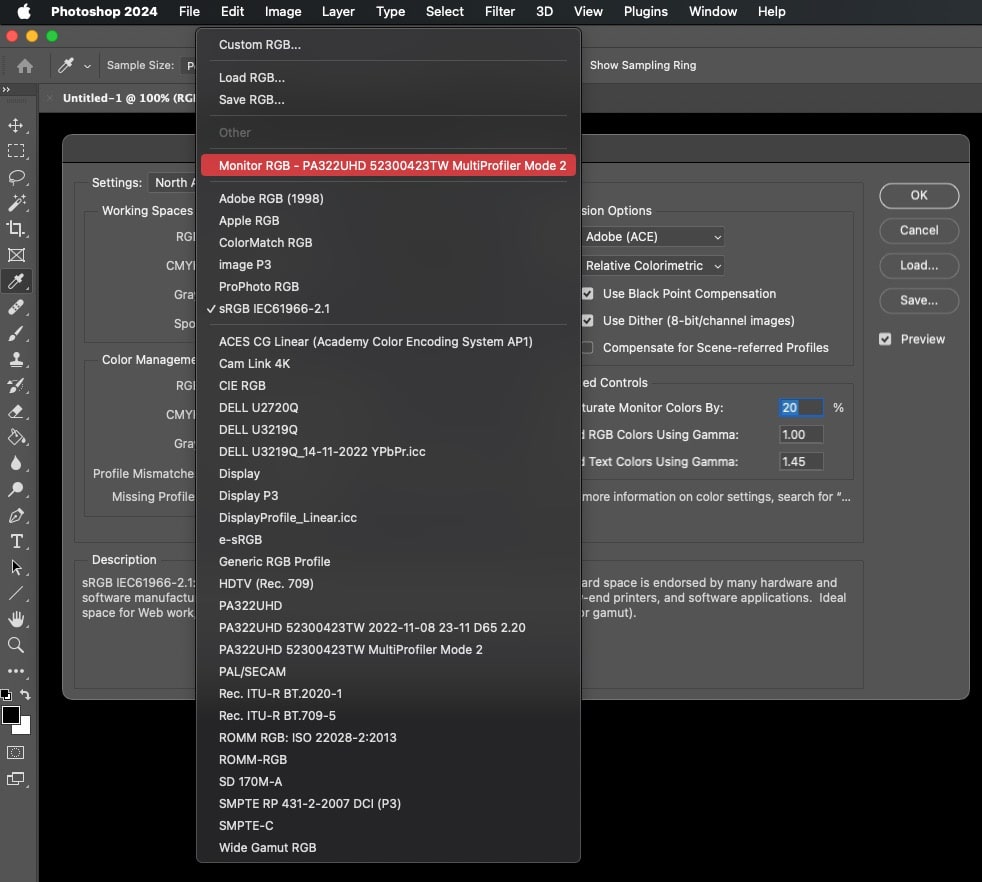
Above you can see that Photoshop sees the same monitor as the primary screen that was selected in the system (highlighted profile – but it should absolutely not be set as PS working space!!!). On a Mac, there is no need to control the profile, and after moving Photoshop to another monitor, the colors return to normal instantly. However, this does not happen on Windows. Turning on sleep mode in macOS also does not cause problems – the computer wakes up with the monitor and is immediately ready to work, with the appropriate profile – without restarting applications.
I have created a separate article, where you can test color management for every web browser as well as additional software installed on the system (graphic browsers, Photoshop and everything else) – you can find it here. I also described in more detail how color management works in different systems and browsers (including on phones and tablets).
From time to time, there is information that since now Windows handles colors well. Meanwhile, I have a computer with Windows and disappointed readers report problems to me even on the latest version. In Windows, it simply works as it wants and on two identical configurations there can be different results.
When does Windows not cause any problems?
Poor color management does not necessarily have to be visible and burdensome. I do not see any contraindications for using Windows when its user has a PC with only one monitor. The gamut of the monitor would have to be limited to sRGB (either natively or through hardware calibration). When all of the above conditions are met, the possibility of color problems occurring, even in native applications, is minimized as much as possible. In theory, everything should be fine. When connecting a monitor via HDMI (instead of DisplayPort or DVI), it is necessary to check in the graphics card driver whether the signal is being transmitted in full range and not limited. This will be okay as long as the monitor has a resolution no greater than 1920 x 1200 px – then using another connector or at least an HDMI version 2.0 is required.
However, there are limitations that can be very burdensome for people professionally involved in photography. A person with an sRGB monitor probably does not edit photos for print, only for the Internet – in that case, a wide gamut on the monitor is not necessary (although this may change in the future). It is also possible that someone gets photos from simple photo-lab instead of just printing, in which case sRGB is usually sufficient. However, let’s be honest – buying better and better lenses while greatly limiting the final effect to sRGB space makes little sense outside of the Internet. Moreover, while in cold countries sometimes the color palette is not very colorful and bright, after each visit to warmer countries with beautiful, everyone will appreciate that even iPhone photos have a wider gamut than sRGB.
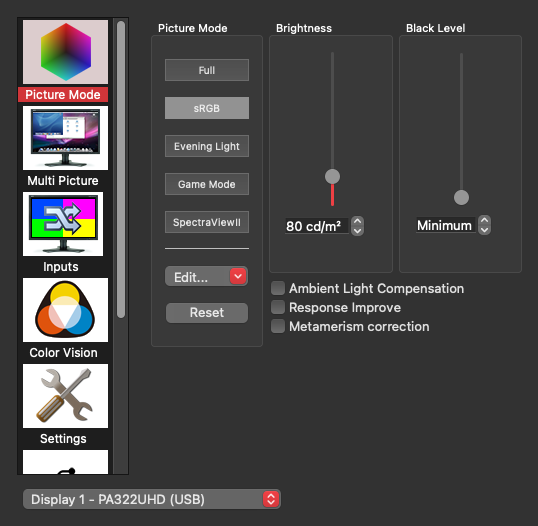
By having a wide gamut monitor, you can calibrate the screen to an additional sRGB target and switch to it when doing anything other than photo editing. Then there will be no oversaturated color where it shouldn’t be. Simply select the appropriate profile, restart your internet browser/photo editing program and that’s it. Often there is also an appropriate option in the monitor menu, but then the color reproduction (lack of calibration) and correct gamma may suffer.
Just photo editing
If the computer is intended only for retouching and not for anything else, then it’s simpler. It doesn’t matter how other applications behave then. At that time you can have no problems, despite having a wide gamut monitor with UHD or higher resolution. In Photoshop and graphic programs that manage color, everything will be fine. PS CC from the first version scales correctly on Microsoft systems. Older versions (CS6 and earlier) unfortunately not, but you can try this method.
In the case of having two monitors, it’s worse – then it’s best to reconcile with the fact that they won’t be as equally useful as on macOS. It is also important to make sure that the program is using the monitor profile on which it was displayed (of course, this also applies to screens built into a laptop with an external monitor connected). Usually it works fine, but sometimes it messes up the monitors and in general it’s difficult to predict how the system will behave in this regard.
As a huge advantage of standard Windows PCs, I consider the possibility of overclocking the hardware to a very high degree, especially since currently overclocking is highly automated and works quite well even with air cooling.
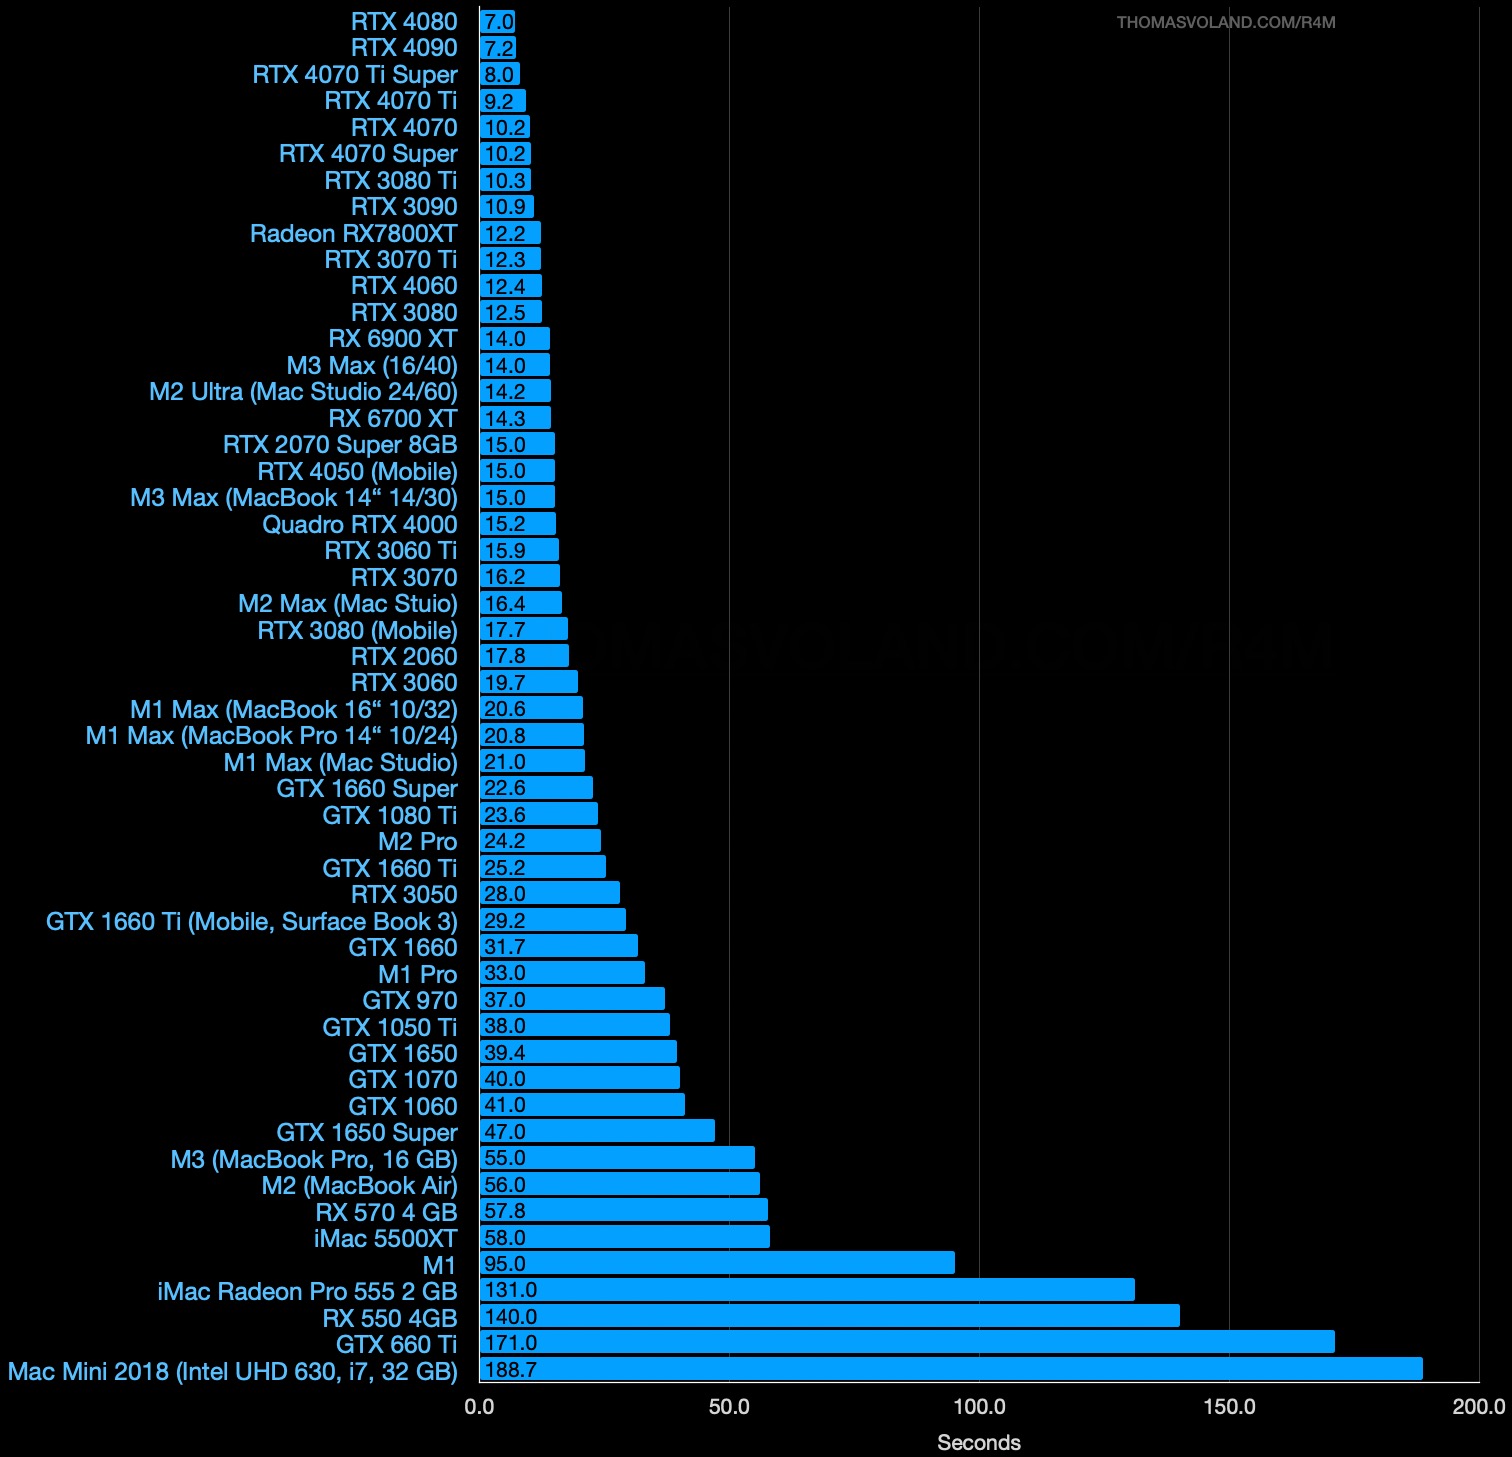
Performance in Retouch4me – benchmark results
I created an automation action for performance testing of the Retouch4me plugin, and presented the results on a dedicated website. Some of them can be seen in the chart below:
How to speed up an old PC
If you are still editing photos up to 12 Mpix in Photoshop and doing it in 8 bits/channel without using A.I., even a decade-old computer with a dual-core i5 should be okay. 2.2 GHz and 8GB of RAM will still manage decently, but it’s definitely worth installing an SSD if you don’t have one yet – responsiveness will increase incredibly. Even if it’s going to be a cheap SATA 3 SSD, it will leave the hard drive far behind in terms of application loading speed and more. The problem could be the compatibility of the GPU with new software. Working with disabled acceleration in Photoshop is a nightmare and I wouldn’t wish it on anyone.
Even worse if it’s not a retouch of individual photos but batch editing, i.e. Lightroom etc. – then older computers can be literally tens of times slower than current ones. Similarly, when working with large 16-bit/channel files. It is important to remember that heavy editing in just 8 bits/channel leads to a decrease in quality, so 16 bits/channel is recommended and even necessary in wider color spaces.
Go to the next page to find out which Mac for retouching is worth buying. In April, I will also try to publish the third page focused on PCs.